Mega Menu
This component allows you to build modern, responsive mega menus visually inside Oxygen. Designed to be used directly inside Oxygen’s header builder, the dropdowns can be populated with any elements or menu items from a WP menu.
If you have 10 minutes, I recommend watching this short workflow with the general concept of how to create a mega menu if starting from scratch..
Quick Guide
Before reading about the individual settings and structure, the main workflow to creating a mega menu is the following..
- Add a mega menu component to the page from the list of components (will appear empty on the page)
- Add mega dropdowns inside of this mega menu, depending on how many you need.
- Choose the default width of the dropdowns from the mega menu settings (these can be changed individually from each dropdown settings also)
- Place any elements inside each dropdown to populate them with content or choose ‘no dropdown’ where you just need links.
- The slide menu component is useful to add menu items directly from any WP menu (choose mega menu list from the slide menu settings to prevent the sliding sub menus)
- Style the dropdowns globally from the mega menu settings or individually from each dropdown settings.
- In the mega menu mobile settings, select the width where you want the mobile menu to kick in.
- Add a burger trigger component somewhere inside of the header to be the trigger for the mobile menu.
Menu Mega Structure
Regardless of which mega menu type you’re creating, the overall HTML structure is the same and it’s useful to become familiar with the structure for the some of the settings to make sense.
1. Mega Menu
The mega menu component itself is the container for the whole thing, to be added to the header builder inside a header row (wherever you want the menu to be positioned when viewing on desktop screens).
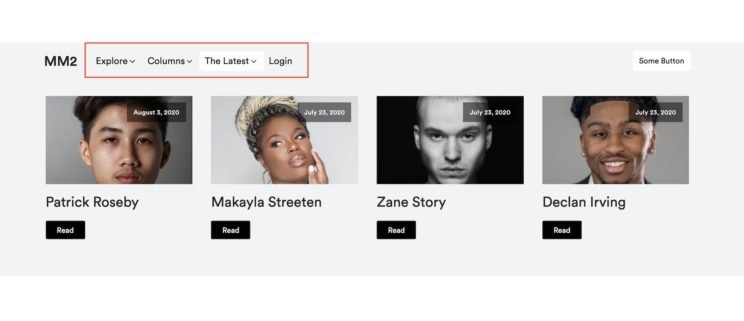
The mega menu component is where all the settings are for the behaviour for the entire component. The ‘general settings’ are applied across all the dropdowns. It’s recommended to set most of the styling from the main mega menu settings. These can easily be overriden by any individual dropdown, if needed afterwards.
2. Mega Dropdown
The mega menu itself doesn’t actually add anything to the page, it’s just an empty container when first added. The dropdowns (called mega dropdowns to make it obvious what they are for) is where all the content is and consist of a few key parts..
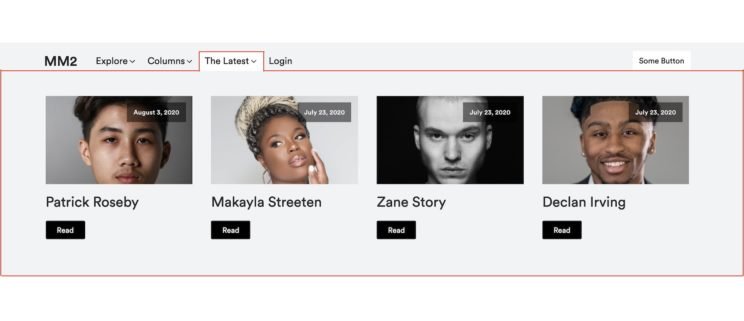
2a Dropdown Links / Icons
The dropdown links are the links inside the header that the user would click or hover to reveal that specific dropdown & it’s contents. The icons can be changed individually inside each dropdown setting, but can be styled globally from the main general settings in the mega menu component.
For the mobile menu, these same dropdown links and icons are used as the ‘accordion’ headers that are clicked to reveal the dropdown content underneath.
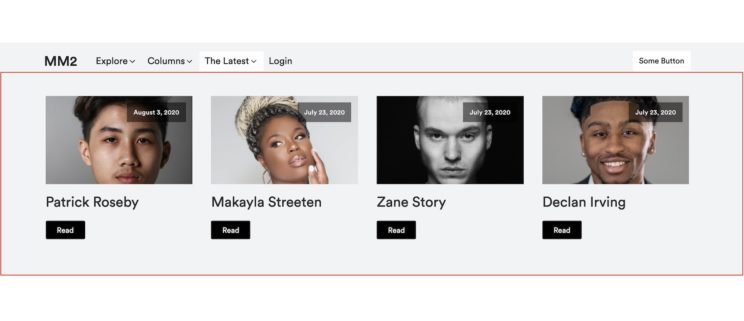
2b Dropdown Container
Directly underneath the links is the dropdown container. The container can be positioned relative to the link itself, with a custom width (as common with dropdown menus). Or it can be positioned relative to the entire header or header row, for creating different types of larger mega menus. Each dropdown can be it’s own width, independent of the global widths set on the entire mega menu.
2c Dropdown Content
Inside the container is a content wrapper that will hold all the elements that are placed inside (or menu items depending on your setting).
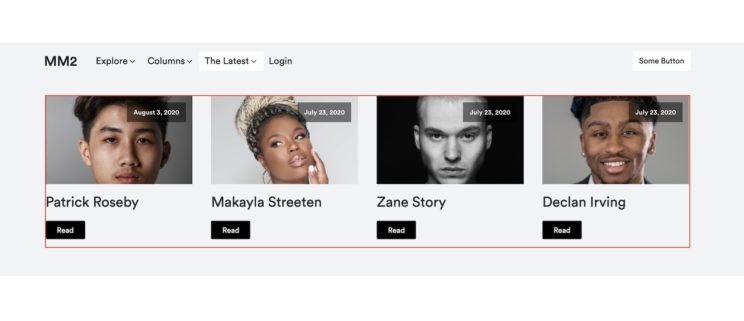
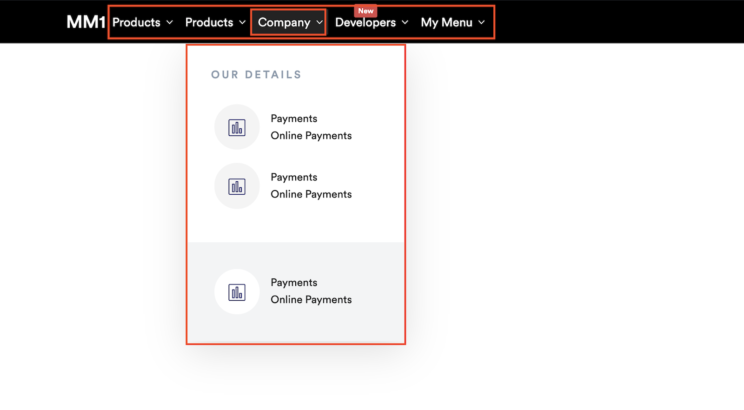
Tip – It’s important to notice the difference here between the container and the content. The widths, the animations and styles can be set differently for both. It isn’t always obvious, see the image below where we’re looking at a custom width dropdown. Here the size of the content & container is exactly the same. However, it’s still important to understand that there are two containers, as you may wish to just fade in the container, yet have the content inside have a transform effect when revealed. It’s more noticable when setting larger dropdowns, where you may want the container to be full width, but the content inside to wrap to the same max-width as your site content.
Mega Menu Type
The current version of the mega menu component comes with two mega menu types.
Individual dropdowns
This is the default setting and likely the most commonly used. It’s the standard behaviour you’d expect from a mega menu. Each dropdown can have it’s own height/width and will only be revealed when the individual dropdown link is clicked or hovered to reveal it.
Container dropdown
The container dropdown is useful for situations where you want all the dropdowns to have the same height/width to act as if they are all inside one container. This style can be seen on the Squarespace website & the old Webflow site (has been since replaced with a simpler menu).
The difference in behaviour here is that the ‘container’ will slide open and remain open as the user browses between the dropdowns. Only the content inside will change as the user browses. The container will only close once the user comes out of the menu container completely. The limitation is of course that all the content inside needs to fit into the specified height and width. It’s a ‘fancier’ effect, but with less use cases.
The expanded height will likely need to be changed across the different screen widths if some of the content overflows onto new lines etc.
Dropdown Widths
The widths can be set across all dropdowns via the general settings in the mega menu component and then changed individually in each dropdown to override if needed.
Custom widths – Each dropdown will have it’s own width. A default container width can be set, then customised by each dropdown.
Header row width (container) – The container will be the same width as the header row, which will often be the same as your default page width you have in your global settings.
Header row width (content) – The container will full width, but the content will wrap to the header row width.
Full width – The dropdown container will span the full width of the browser, the content inside will also be full width, but can be set to a custom width.
General Settings
The mega menu component has general settings that will affect the entire menu and all of the dropdowns inside. It’s recommended to style all of the dropdowns from these general mega menu settings so they can be applied across the entire menu, as opposed to doing each individually or using classes to copy the styles.
So things like icon styles, dropdown animations, hover styles, link styles & typography will all be consistent across all of the dropdowns.
User Interaction
Open delay – How long the user needs to hover over a dropdown link before the dropdown is revealed. Giving a small delay can be useful if you have the menu items quite close together and it’s easy to accidently open up the wrong dropdown when browsing.
Close delay – How much delay before the dropdown closes.
Allow mouseover to reveal dropdowns – Enabled by default. If disabled, then hovering over the dropdown links won’t reveal the dropdowns, the user would need to click or tap.
Allow mouseover to open tabs in dropdowns – If using Oxygen’s tabs component to display content inside of the mega menu, you can choose to change the default behaviour and allow the user to simply hover over the tabs to reveal the content instead of having to click. Which is more typical of tabs found inside mega menus.
Animation
There are two animation controls for customizing how the dropdowns are revealed. See above the explination of the difference between the container and the content, they are two different containers and both fade and transforms can be added to each to give lots of flexibility on how you wish them to animate into view.
When setting the transforms, what you’re doing is setting the starting position of the element before it animates into view. Eg setting the TranslateY to 10px means the dropdown container will start 10px down from it’s actual position, then animate up 10px when revealed.
Mobile Menu
The mobile menu uses the exact same structure as the desktop, all the styles flow naturally from desktop to mobile, so everything regarding the structure will work out of the box.
The dropdown links & icons stack up on top of each other at the screen width you choose and the dropdown containers are hidden waiting to be revealed by clicking the links (if hash links) or icons.
Any element can be used to reveal the mobile menu, the burger trigger component is the default and the recommended method. Just hide the burger for desktop and make it appear on mobile using the display setting.
If using a custom header (not the header builder) make sure the ‘support for custom header’ is enabled and your header has a <header> tag,
Pro Tips
- Use the settings on the main megamenu component where possible. The styles will be inherited naturally & it’s the fastest workflow.
- Use classes for elements you put inside the dropdowns. You’ll probably be making adjustments of widths & spacing for the mobile menu & it will be much easier to just change on the classes rather than going through every element.
- Use the slide menu component as a convenient way to add menu lists that can be editable by clients direct from the menu dashboard.
- Oxygen’s native tabs components can be used inside the dropdowns and be set to open on mouseover for desktop.