Hotspots & Popovers
These two components can be used to create popovers, tooltips, hotspots, and hotspot tours that can be styled visually in Oxygen and have the option to be edited dynamically by linking to dynamic data such as ACF fields.
Some feature hightlights & use cases..
- Hotspots enable users to navigate between hotspots as tours to walk them through features.
- Use popovers individually anywhere on the page.
- Add tooltips to existing elements, styled visually with popover content built with any elements.
- Use dynamic data to dynamically populate the markers, the popover content, the positioning & the placement of the popovers.
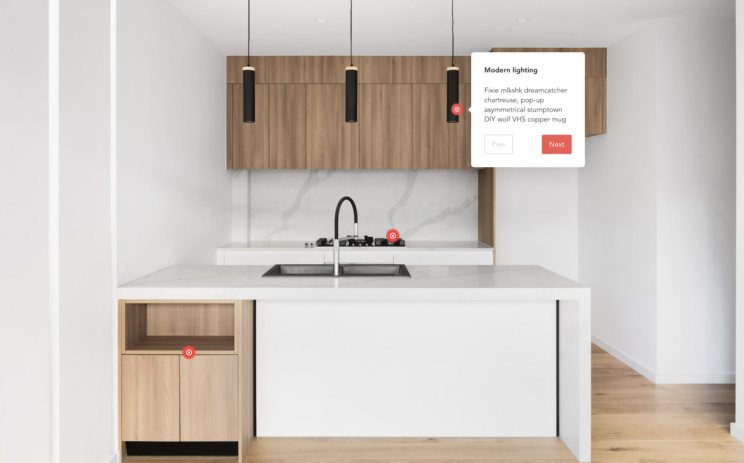
Hotspots
The main three items that make up your hotspots are:
- The hotspots component to act as the container for everything.
- The object you want to add hotpots to. Ex.: an image component.
- Popover components for the individual markers.
The structure will look something like this..
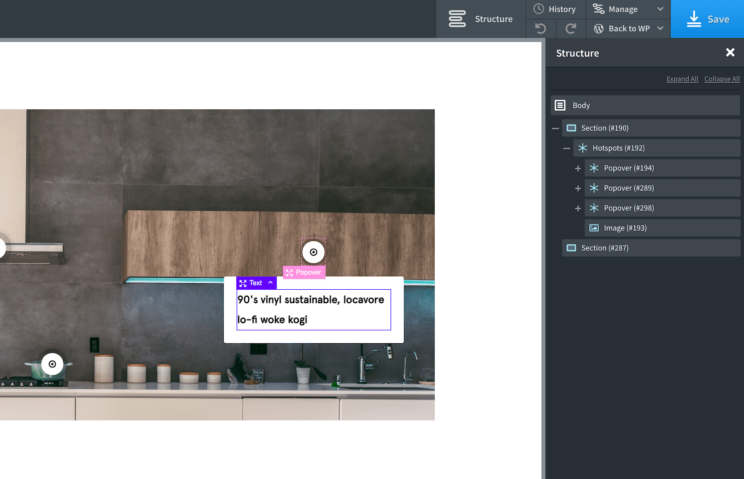
You can also add dynamic hotspots, by using a repeater and having it as the very first item inside the hotspot with your popover inside. (we recommend setting the repeater to ‘single’ mode while styling the element).
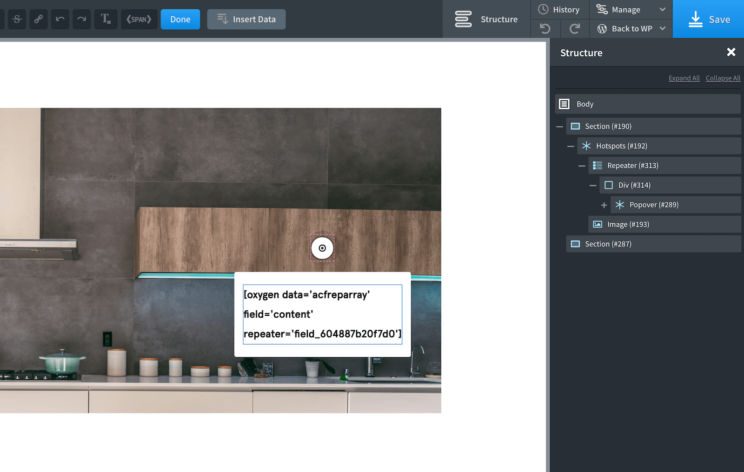
The content, the label, the positioning, and the popover placement can all be controlled with dynamic data. Once the structure is set up and styled, it can all be managed from outside of Oxygen using custom fields.
Most of the functionality is coming from the popovers themselves, but the hotspot container comes with a few settings..
Hotspot open on page load – ‘First’ will automatically find the first hotspot marker and open it when the user first lands on the page. ‘All’ will ensure they are all open on page load.
Allow user to navigate between hotspots – You can enable the ability for users to go backward and forwards between the hotspots. The buttons or links to go previous and next can be any elements inside the popovers, you just need to give the correct selectors.
Disabled Navigation Opacity – This setting will change the opacity of the prev/next elements when they are disabled. ie the Previous link when the user is at the first hotspot and the Next link when they reach the last hotspot.
Popovers
The popovers themselves have different main primary settings depending on what you’re using them for.
Type: Hotspot Marker
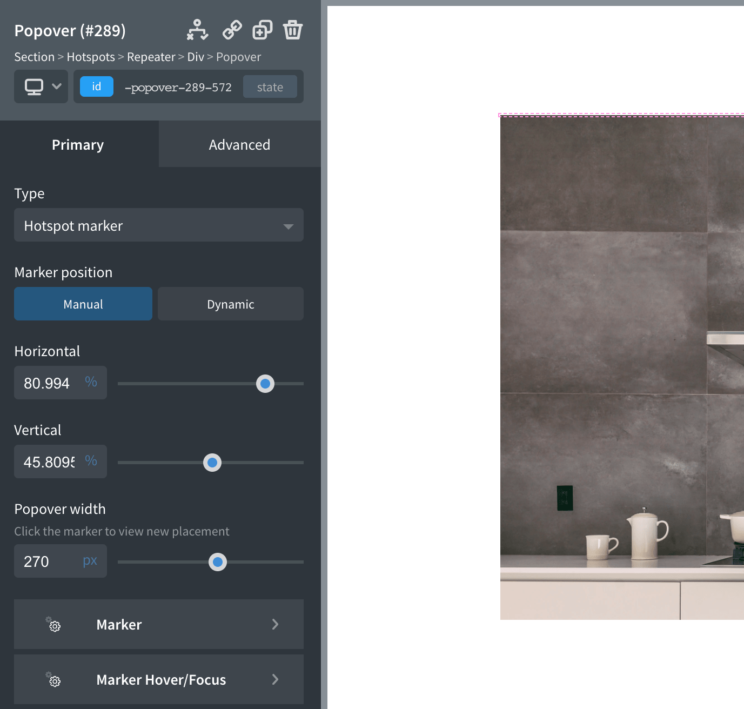
If you’re using them as hotspot markers inside of a hotspots container, then you’ll find both manual and dynamic Horizontal and Vertical controls to help you position the marker in the correct place on the image.
If using dynamic positioning, the format is ‘50%,50%’ where the first percentage is horizontal, and the second is vertical. This ensures support with ACF: Image Hotspots Fields, allowing content editors to visually place the markers on the image from the post edit screen.
Type: Popover
If you’re using the popover as a regular popover element that you wish to position yourself somewhere on the page, you have a few different options available.
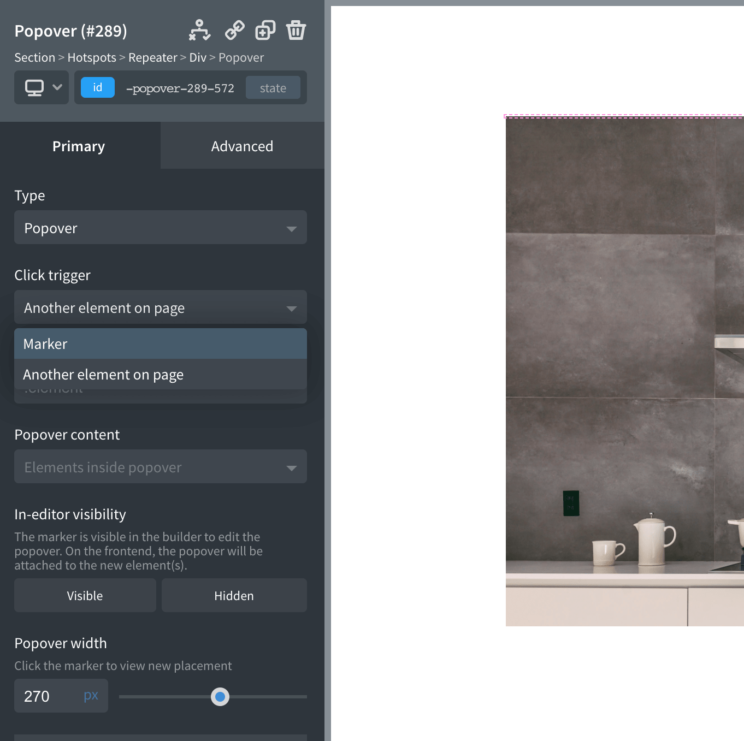
Trigger
- ‘Marker’ you’ll be adding the marker somewhere on the page and using that as the trigger that the user needs to click, or focus on to open the popover. As with the hotspots marker, it can be styled as a button, or link, with text &/or an icon.
- By selecting ‘Another element on page’ you’ll be providing the selector of an element on the page that you wish to be the trigger. So when a user interacts with that element, the popover will open. This is useful if you’re wanting to add tooltips/popovers to existing elements.
Popover Contents – If you’re adding the popover to another element on the page, for eg to be used as a type of tooltip, you can choose to either add the elements inside yourself, or use an attribute on that element to store the content. Of course, you’re limited when adding content via attributes, but the benefit is that for simple tooltips, this allows you to just use one popover component that will add popovers to multiple elements with the same class. You can add a class that is found in multiple places and then add your attribute to each one individually. They will all inherit the same styles and animation effects etc.
Note – while inside the builder, you’ll always be seeing the marker, whichever option you choose. This means you can just open up the popover anytime to style or add elements by just clicking the marker. (there’s also an option to hide it)
Styling the Marker
The marker can be an icon, text or both. There are a number of styable states.. when hovered, when focused, when active & the regular styles. It’s recommended to style everything with classes so you can easily share the styles across multiple elements and change them in bulk if needed.
Popover Placement
Popover placement – The popover placement is where the popup will appear relative to the marker (or another element if you’ve chosen that option). The options are auto, top, left, right, bottom and auto. Auto just means that it will popup wherever it can find space.
Offset X Offset Y – The offsets are the distance (in px) between the marker and the popover.
Allow to flip placement – The flipping is for when there isn’t enough space in the direction you’ve chosen for the placement. If you’ve chosen right, but on smaller screens there isn’t quite enough room on the right, do you want it to flip to another position?
Fallback placements – If you’re allowing the above. You can specify where you’d rather it flip to. This is in order of preference, so if you’re original placement is to the right, but there’s not enough room.. it will then look at the first in the list to see if there is room there, if not it’ll try the next one and so on..
Popover Styles
The main styles for the popover container can be styled from this tab. Main background color, typography, spacing, shadows etc.
Then from there, anything you place inside of the popover can be individually styled like you would any other component.
Popover Animation
Translate, scale and rotate give you full control over the popover reveal animation. The UI you will recognise from both the lightbox component and the mega menu components and works in the same way.
The animations can be previewed easily inside of the builder by just clicking the marker again after changing the settings to reveal the popover.
Pulse Animation
The pulse animation is mainly for use with the hotspots, to help bring attention to the markers against a noisy image background. That said, they can also be used when not using the hotspot marker setting.
The pulse will take the shape of the marker and you can change the colour, size, animation speed to customise either single or double pulses.
Advanced
User interaction – The default behaviour is that the popovers will open on click. There are a number of options available, including mouseover and focus depending on what you want the user experience to be.
Prevent DOM unmount – The default behaviour for popovers is to be mounted to the DOM at the moment just before popover is opened. It’s recommended to leave this disabled. However, there may be a reason you wish for the popover not to unmount in the first place. One reason would be you’re adding some dynamic element with custom code that doesn’t handle being unmounted from the DOM without breaking in some way. So enabling this will solve it. Note that the arrows feature is not currently available with this enabled.
Pro Tips
- You’re likely already aware of the unexpected behavior that can occur when using a repeater inside the builder. And the jarring experience as you’re adding new elements. If using a repeater to dynamically add popovers, we recommend setting the repeater to ‘single’ mode, so you’re only dealing with one popover while styling and adding content.
- Hotspots can be added to any element, the image is the most common. The positioning of the hotspots is always going to be relative to this object. So it would need to be something that has a fixed aspect ratio across all devices.
- The markers are buttons and are accessible via keyboard, but remember to add individual focus styles so it’s visible when the user has tabbed to the element. If the user interaction is set to ‘click’. Then pressing the space key will open up the popover.