Carousel Builder
This component allows you to build dynamic carousels in Oxygen. The carousels can be for a wide range of uses, testimonial sliders, featured posts & pages, supporting the Repeater component, Easy Posts, Product Lists, Related Products or building your own carousel with cells made of any elements.
Here are some short teaser videos showing some of the functionality with building custom carousels in Oxygen..
Table of Contents
- In-Editor Mode
- Building a Carousel – Workflow
- Behaviour / Interaction
- Navigation Arrows
- Page Dots
- Gallery Captions
- Loading / Performance
- Syncing
- Parallax
- Tips
- Tutorials
- Incompatible Plugins
- FAQs
Important: As a best practice, we recommend adding overflow: hidden to the carousel in the advanced setting, to prevent any overflow from the hidden cells as the page loads. If you need certain elements to overflow (eg it’s common for navigation arrows to sit outside of the carousel, then instead add overflow hidden to the section that the carousel is inside of).
In-Editor Mode
There are two main working ‘modes’ when working with the carousel builder inside of Oxygen itself; ‘Preview’ and ‘Edit’. With some settings, the changes will only be visible when inside Oxygen depending on which mode you are in.
Edit Mode
Edit mode is the default mode to build your carousel and where you’ll find yourself most of the time. In edit mode all elements inside the carousel builder are completely editable, so you are free to add elements, style elements using the UI, and build freely like you would build anything else in Oxygen.
Preview Mode
Preview mode allows you to preview what the final design will look like from inside the builder as the carousel initializes and becomes functional. Clicking on the carousel while in preview mode will move the carousel to the next cell. You can also navigate forwards and backward using the navigation elements if you are using them in your carousel.
Important – do not attempt to drag the carousel while inside Oxygen as you’ll be dragging the elements to reposition them.
The settings available in preview mode are mainly for controlling how the carousel behaves, for eg how many cells to move at once (grouping cells), changing the cell alignments & setting the friction & drag for the user interaction with the carousel.
Preview mode is not for making changes to the cell widths, heights, or for repositioning or styling elements. In preview mode the elements inside the carousel are non-selectable and some of the layout controls will be hidden. To make changes such as these, head back into edit mode.
Note – The quickest way to see the recommended workflow is to watch this video showing a testimonial carousel being built from start to finish in five minutes.
For advanced users – we are using Flickity to power the carousel builder. If you already have some experience with Flickity and a few of the options, you likely won’t need to read this documentation as it all should be pretty intuitive from exploring the controls.
Building a Carousel – Workflow
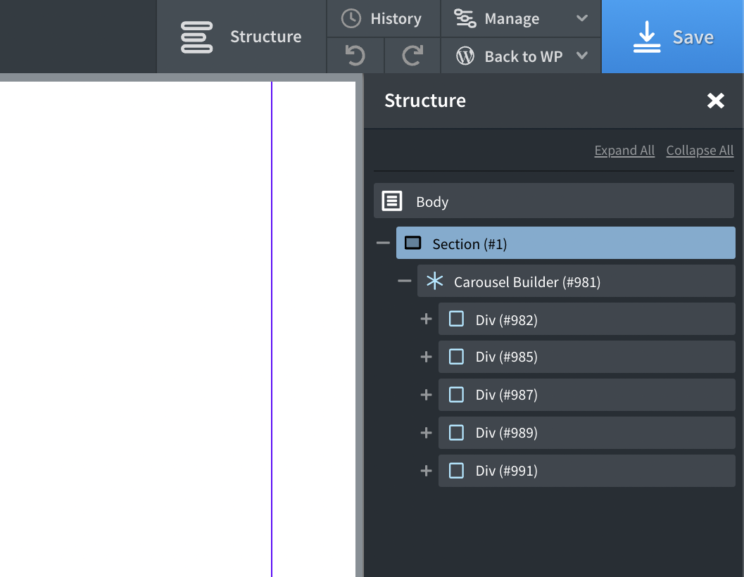
The first step after adding a new carousel builder to the page is to choose the element inside which will act as the container for the carousel. Supported components are the Repeater, Easy Posts, Woo components such as Product List, Category List, Related Products, Product Upsells, which can be placed inside of the carousel builder.
You can also choose to add elements manually using the ‘custom elements’ option in the dropdown. Here you can add elements as children of the carousel to be the cells. You just need to give the elements the class ‘cell’ to make sure they are used as the cells inside the carousel.

If using the Repeater component or the Easy Posts component, the next step would be to set the repeater query to get whichever dynamic data you want and then start adding in your elements and style the individual cell. At this stage, you’d just be focused on building/styling one individual cell (no different from the usual workflow with the repeater) and not on the overall layout of the carousel itself.
Depending on which components you are adding to build the carousel, different settings may appear in the ‘Other’ tab. For eg if creating a Woocommerce carousel, there are some additional options to hide some of the elements you may not need to visible inside a carousel such as the buy buttons, the price, the results count, the sorting dropdown, etc.
Carousel Layout
When it comes to the layout of the carousel itself, which includes choosing the height and width of the cells inside, this can all done from the inside the carousel builder’s primary controls.
Cells Tab
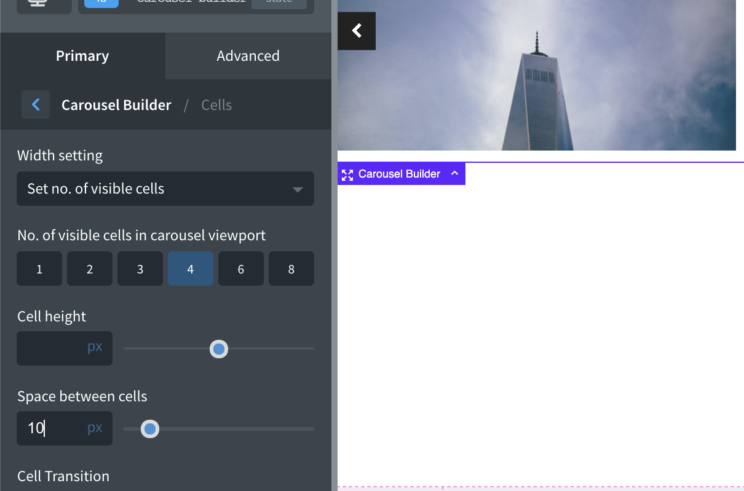
From inside the cells tab, the width and heights of each cell can be changed across different screen sizes by using Oxygen’s responsive dropdown menu. The widths are in percentages by default, this allows you to easily choose how much of each cell will be visible at each different viewport width. Instead of choosing a width, you can also choose the number of cells you need visible at each break point.

The space between setting will add margin in between the cells.
The selected cells and prev/next cell tabs allow you to add some styles to the repeater div conditionally. These styles will only be applied when it is either the currently selected cell or the one previous or the one next. If you are grouping cells (meaning more than one cell will be selected at one time) then the styles will apply to the whole group.
Pro Tip – dynamic classes are added to the cells only when they are selected or are adjacent to the currently selected cell. The classes that are added are..
- is-selected
- is-previous
- is-next
This means you are not limited to the style controls that are built-in. You can add custom selectors in Oxygen to target any specific elements that you have added inside your carousel only when they are inside a selected cell.
Carousel Tab
This tab is where you’ll find most settings for the layout of the carousel itself. How it will group the cells, how to handle different heights, which cell to start on, how to align the cells in relation to the carousel etc.
Group Cells – Multiple cells can be grouped together to move as one object when using the navigation arrows or pagination dots.
Initial cell selected – Here you can choose which cell to be selected when the page first loads.
Cell Align – Align cells within the carousel.
Overflow – Choose whether the carousel overflows the container in the x-axis.
Adaptive Height – If enabled the entire carousel will change the height to match the height of the selected cell. You also have the option to change the transition of the height change for a smoother effect.
Contain – Contains cells to carousel element to prevent excess scroll at the beginning or end.
Click cell to select – Allows users to browse through the carousel by clicking on cells to select them instead of just dragging.
Carousel is draggable – Enables dragging and flicking. On by default.
Autoplay – Automatically advances to the next cell at an interval set in ms. Leaving at zero disables autoplay.
Percentage Position – Sets positioning in percent values, rather than pixel values. This is enabled by default and should only be disabled if you’re setting px values for your cells.
Right to Left – Enables right-to-left layout for the carousel.
Behaviour / Interaction
This is where you can control how the user interacts with the carousel & how you need it to behave.
Transition type – Do you want the carousel to fade to the next slide or to slide across
Autoplay – Automatically advances to the next cell at an interval set in ms. Leaving at zero disables autoplay.
Wrap around – When a cell reaches the end of the carousel viewport, it will wrap around and reposition itself back at the beginning ready to be shown. This gives the illusion of there being infinite cells as the user scrolls in one direction.
Free Scrolling – Enables content to be freely scrolled and flicked without aligning cells to an end position.
Retrigger AOS animations – If you’re using Oxygen’s scroll animations on elements inside of the cells, this setting will ensure they are retriggered for each cell that becomes selected. This is useful when using full screen slides and want the content to fade in as the user browsers.
Ticker (continuous play) – If wrap around is enabled, there is also an option to have the cells continuously play at a set speed. Useful for logo tickers. Note that it’s best to remove the navigation arrows if this feature is active.
Screenshot

JSON of a Page having a carousel in ticker mode
{"id":0,"name":"root","depth":0,"children":[{"id":2,"name":"ct_section","options":{"ct_id":2,"ct_parent":0,"selector":"section-2-4757","original":{"image_type":"2","attachment_size":"full"},"nicename":"Section (#2)","activeselector":false},"depth":2,"children":[{"id":3,"name":"oxy-carousel-builder","options":{"ct_id":3,"ct_parent":2,"selector":"-carousel-builder-3-4757","original":{"image_type":"2","attachment_size":"full","oxy-carousel-builder_slug_oxydynamiclistctdivblockoxydynamiclistflickitysliderctdivblock_width":"20","oxy-carousel-builder_slug_oxydynamiclistctdivblockoxydynamiclistflickitysliderctdivblock_margin_right":"20","oxy-carousel-builder_wrap_around":"true","oxy-carousel-builder_nav_type":"none","oxy-carousel-builder_maybe_ticker":"true","oxy-carousel-builder_ticker":"1.5","oxy-carousel-builder_page_dots":"false"},"nicename":"Carousel Builder (#3)","activeselector":false},"depth":3,"children":[{"id":4,"name":"oxy_dynamic_list","options":{"ct_id":4,"ct_parent":3,"selector":"_dynamic_list-4-4757","original":{"image_type":"2","attachment_size":"full","wp_query":"custom","query_post_types":["post"],"query_count":"10"},"nicename":"Repeater (#4)","activeselector":false},"depth":4,"children":[{"id":6,"name":"ct_div_block","options":{"ct_id":6,"ct_parent":4,"selector":"div_block-6-4757","original":[],"nicename":"Div (#6)"},"depth":5,"children":[{"id":210,"name":"ct_link","options":{"ct_id":210,"ct_parent":6,"selector":"link-210-4757","original":{"url":"[oxygen ct_sign_sha256='2041adf461d83710b5fbc28a88c177946fa1bdfdacd8e71ce42c15c44981783a' data='permalink' ]"},"nicename":"Link Wrapper (#210)"},"depth":6,"children":[{"id":187,"name":"ct_headline","options":{"ct_id":187,"ct_parent":210,"selector":"headline-187-4757","original":{"image_type":"2","attachment_size":"full","tag":"h3"},"nicename":"Heading (#187)","ct_content":"<span id=\"ct-placeholder-188\"><\/span>","activeselector":false},"depth":7,"children":[{"id":188,"name":"ct_span","options":{"ct_id":188,"ct_parent":187,"selector":"span-188-4757","original":[],"nicename":"Span (#188)","ct_content":"[oxygen ct_sign_sha256='612014d631ec7d5f86d93592725af59e268a606e2882bb3c7e0e761fdf69300a' data='title' ]"},"depth":8}]}]}]}]}]}]}],"meta_keys":[],"outerTemplateData":{"edit_link":"https:\/\/oxygen.local\/wp-admin\/post.php?post=9&action=edit","template_name":"Default Page"}}Hydrogen code for the Section
eyJzb3VyY2UiOiJodHRwczovL294eWdlbi5sb2NhbCIsImNvbXBvbmVudCI6W3siaWQiOjIsIm5hbWUiOiJjdF9zZWN0aW9uIiwib3B0aW9ucyI6eyJjdF9pZCI6MiwiY3RfcGFyZW50IjoxMDAwMDMsInNlbGVjdG9yIjoic2VjdGlvbi0yLTQ3NTciLCJvcmlnaW5hbCI6eyJpbWFnZV90eXBlIjoiMiIsImF0dGFjaG1lbnRfc2l6ZSI6ImZ1bGwifSwibmljZW5hbWUiOiJTZWN0aW9uICgjMikiLCJhY3RpdmVzZWxlY3RvciI6ZmFsc2V9LCJkZXB0aCI6MywiY2hpbGRyZW4iOlt7ImlkIjozLCJuYW1lIjoib3h5LWNhcm91c2VsLWJ1aWxkZXIiLCJvcHRpb25zIjp7ImN0X2lkIjozLCJjdF9wYXJlbnQiOjIsInNlbGVjdG9yIjoiLWNhcm91c2VsLWJ1aWxkZXItMy00NzU3Iiwib3JpZ2luYWwiOnsiaW1hZ2VfdHlwZSI6IjIiLCJhdHRhY2htZW50X3NpemUiOiJmdWxsIiwib3h5LWNhcm91c2VsLWJ1aWxkZXJfc2x1Z19veHlkeW5hbWljbGlzdGN0ZGl2YmxvY2tveHlkeW5hbWljbGlzdGZsaWNraXR5c2xpZGVyY3RkaXZibG9ja193aWR0aCI6IjIwIiwib3h5LWNhcm91c2VsLWJ1aWxkZXJfc2x1Z19veHlkeW5hbWljbGlzdGN0ZGl2YmxvY2tveHlkeW5hbWljbGlzdGZsaWNraXR5c2xpZGVyY3RkaXZibG9ja19tYXJnaW5fcmlnaHQiOiIyMCIsIm94eS1jYXJvdXNlbC1idWlsZGVyX3dyYXBfYXJvdW5kIjoidHJ1ZSIsIm94eS1jYXJvdXNlbC1idWlsZGVyX25hdl90eXBlIjoibm9uZSIsIm94eS1jYXJvdXNlbC1idWlsZGVyX21heWJlX3RpY2tlciI6InRydWUiLCJveHktY2Fyb3VzZWwtYnVpbGRlcl90aWNrZXIiOiIxLjUiLCJveHktY2Fyb3VzZWwtYnVpbGRlcl9wYWdlX2RvdHMiOiJmYWxzZSJ9LCJuaWNlbmFtZSI6IkNhcm91c2VsIEJ1aWxkZXIgKCMzKSIsImFjdGl2ZXNlbGVjdG9yIjpmYWxzZX0sImRlcHRoIjo0LCJjaGlsZHJlbiI6W3siaWQiOjQsIm5hbWUiOiJveHlfZHluYW1pY19saXN0Iiwib3B0aW9ucyI6eyJjdF9pZCI6NCwiY3RfcGFyZW50IjozLCJzZWxlY3RvciI6Il9keW5hbWljX2xpc3QtNC00NzU3Iiwib3JpZ2luYWwiOnsiaW1hZ2VfdHlwZSI6IjIiLCJhdHRhY2htZW50X3NpemUiOiJmdWxsIiwid3BfcXVlcnkiOiJjdXN0b20iLCJxdWVyeV9wb3N0X3R5cGVzIjpbInBvc3QiXSwicXVlcnlfY291bnQiOiIxMCJ9LCJuaWNlbmFtZSI6IlJlcGVhdGVyICgjNCkiLCJhY3RpdmVzZWxlY3RvciI6ZmFsc2V9LCJkZXB0aCI6NSwiY2hpbGRyZW4iOlt7ImlkIjo2LCJuYW1lIjoiY3RfZGl2X2Jsb2NrIiwib3B0aW9ucyI6eyJjdF9pZCI6NiwiY3RfcGFyZW50Ijo0LCJzZWxlY3RvciI6ImRpdl9ibG9jay02LTQ3NTciLCJvcmlnaW5hbCI6W10sIm5pY2VuYW1lIjoiRGl2ICgjNikifSwiZGVwdGgiOjYsImNoaWxkcmVuIjpbeyJpZCI6MjEwLCJuYW1lIjoiY3RfbGluayIsIm9wdGlvbnMiOnsiY3RfaWQiOjIxMCwiY3RfcGFyZW50Ijo2LCJzZWxlY3RvciI6ImxpbmstMjEwLTQ3NTciLCJvcmlnaW5hbCI6eyJ1cmwiOiJbb3h5Z2VuIGN0X3NpZ25fc2hhMjU2PScyMDQxYWRmNDYxZDgzNzEwYjVmYmMyOGE4OGMxNzc5NDZmYTFiZGZkYWNkOGU3MWNlNDJjMTVjNDQ5ODE3ODNhJyBkYXRhPSdwZXJtYWxpbmsnIF0ifSwibmljZW5hbWUiOiJMaW5rIFdyYXBwZXIgKCMyMTApIn0sImRlcHRoIjo3LCJjaGlsZHJlbiI6W3siaWQiOjE4NywibmFtZSI6ImN0X2hlYWRsaW5lIiwib3B0aW9ucyI6eyJjdF9pZCI6MTg3LCJjdF9wYXJlbnQiOjIxMCwic2VsZWN0b3IiOiJoZWFkbGluZS0xODctNDc1NyIsIm9yaWdpbmFsIjp7ImltYWdlX3R5cGUiOiIyIiwiYXR0YWNobWVudF9zaXplIjoiZnVsbCIsInRhZyI6ImgzIn0sIm5pY2VuYW1lIjoiSGVhZGluZyAoIzE4NykiLCJjdF9jb250ZW50IjoiPHNwYW4gaWQ9XCJjdC1wbGFjZWhvbGRlci0xODhcIj48L3NwYW4+IiwiYWN0aXZlc2VsZWN0b3IiOmZhbHNlfSwiZGVwdGgiOjgsImNoaWxkcmVuIjpbeyJpZCI6MTg4LCJuYW1lIjoiY3Rfc3BhbiIsIm9wdGlvbnMiOnsiY3RfaWQiOjE4OCwiY3RfcGFyZW50IjoxODcsInNlbGVjdG9yIjoic3Bhbi0xODgtNDc1NyIsIm9yaWdpbmFsIjpbXSwibmljZW5hbWUiOiJTcGFuICgjMTg4KSIsImN0X2NvbnRlbnQiOiJbb3h5Z2VuIGN0X3NpZ25fc2hhMjU2PSc2MTIwMTRkNjMxZWM3ZDVmODZkOTM1OTI3MjVhZjU5ZTI2OGE2MDZlMjg4MmJiM2M3ZTBlNzYxZmRmNjkzMDBhJyBkYXRhPSd0aXRsZScgXSJ9LCJkZXB0aCI6OX1dfV19XX1dfV19XX1dLCJjbGFzc2VzIjp7fSwiY29sb3JzIjp7fX0=Carousel can be dragged – You can disable the ability for users to drag the cells. In this case, moving the carousel would be limited to pressing the arrows, the page dots or just allowing the carousel to move on it’s own if autoplay or the ticker is enabled.
Clicking a cell will select it – By default, just clicking on a cell won’t select it. The user would need to drag or click the animation to actually move the carousel. This behaviour can be changed so clicking will immediately select that cell (and maybe move it, depending on other settings).
Pause Autoplay on hover – The autoplay will pause while the user’s cursor is positioned somewhere in the carousel. This is so if the user is intending on clicking on something, the carousel doesn’t shift the button or link out of the way and prevent them from doing so. If the carousel doesn’t need to be interacted with, this can be disabled.
Keyboard Navigation – Enable keyboard navigation. Users can tab to a Flickity carousel, and pressing left & right keys to change cells.
Friction / Drag
The controls are the only controls where the results cannot be seen inside Oxygen, no matter which mode you are in. This is because it controls the dragging motion, something that cannot be done from inside the builder.
Drag Threshold – Choose the number of px that the user needs to drag before the carousel will be moved. (useful to prevent accidental dragging)
Selected Attraction – Attracts the position of the slider to the selected cell. Higher attraction makes the slider move faster. Lower makes it move slower. If creating a fade carousel, this setting will speed/slow the fade transition. Note that for fade, it’s very sensitive, you want to be using between 0.01 – 0.025.
Friction – Slows the movement of the carousel. Higher friction makes the carousel feel stickier and less bouncy. Lower friction makes the slider feel looser and more wobbly.
Free Scroll Friction – Only available if free-scrolling is enabled. Higher friction makes the slider feel stickier. Lower friction makes the slider feel looser
Navigation Arrows
The built-in icons will be suitable for most use cases. The icons can be changed to any custom icons. They are positioned relative to the carousel to sit center aligned on either side. All the style controls found underneath apply to these built in icons.
If you choose the ‘use custom elements’ instead of using the preset icons, you can then choose any elements on the page to function as either the previous or next navigation buttons for the carousel. These elements don’t need to be inside of the carousel builder, they can be anywhere on the page. None of the style controls will apply to your custom elements, you would instead style use the style controls on the elements that you are using.
Choosing ‘none’ will simply remove the navigation completely from the carousel.
Page Dots
The page dots can be styled, repositioned or not output at all. The active styles are useful for giving the user visual feedback on where they are inside the carousel.
If you’re wishing to use page dots on desktop, but remove from mobiles where there may not be enough room, you can select the breakpoint where you want to hide the dots below from the dropdown.
tip – if there are lots of page dots, consider changing the cell grouping so there aren’t so many ‘pages’ of cells to flick through.
Gallery Captions
If building a gallery slider, you can add captions to the images. ACF galleries will include captions as long as you are selecting ‘array’ as the output.
These captions overlay the images inside of the cells and have their own style controls.
Loading / Performance
Unlike traditional lazy loading where the users scroll positioning determines when the images are to load, this loading is for where the user is inside the carousel.
This way if your carousel has 20 cells with images, but only 3 are visible on page load, we can lazy load the other images until they come into view.
Support lazy loading – This must be enabled to activate the lazy loading support. Note – this only activates support, the lazyload attribute will need to be added onto the elements manually. eg inside a repeater using an image component, instead of using the Image URL field to populate the src of the image, instead go to advanced > attributes and add the attribute name ‘data-flickity-lazyload-src’ followed by the dynamic data for the URL of the images (same process as the Image URL field)
Support background lazy loading – Any background images can be lazy loaded in the same way as inline images. After enabling this setting, the way to implement is to find the element with the background image. Remove it from the background style settings and instead add it as a custom attribute using ‘data-flickity-bg-lazyload’ as the attribute name.
Number of adjacent cells – How many cells away from the currently selected cell until the images are lazy loaded.
Fade duration for lazy images – If choosing a low number for adjacent cells, the cells may be scrolled to before the image has been loaded. Adding a fade duration can help make a smoother image reveal.
Browser Performance – To get maximum smooth transitions on your carousel, enabling browser performance will ensure the browser will do it’s best to get 60fps by taking advance of the ‘will-change’ CSS property. It’s off by default, and if used too much on a page can sometimes hurt performance, you’d need to test it. Generally though, it just makes things less jerky and smoother.
Fade-in Carousel After Initialised – If you’re using carousels above the fold (visible when the page first loads) you may wish to hide that split second of adjusting that the carousel does as it’s loading the contents. Enabling this setting will ensure the carousel is only visible once it’s finished loaded, and will fade in smoothly.
Syncing
Use as Navigation – Use one carousel as navigation for another. Enter the selector of the other carousel builder. Both carousels will now be connected one way, which means if the user clicks on this carousel’s cells, it will navigate the other carousel remotely. Useful for creating small thumbnail galleries to navigate the larger carousel.
Sync Carousels – Similar to the above, but with a couple of differences..
- The sync is two ways. The cell index is actually synced. So no matter what method you use to navigate one carousel, the other will always select the same number cell. And it’s the same both ways. Selecting cell 4 from carousel 1 will always select cell 4 from carousel 2.
- You can chain-sync as many carousels as you like, meaning lots of complicated layouts are possible with multiple carousels. (Chain-sync meaning you sync 1 to 2, then 2 to 3, and 3 to 4 etc, meaning they can all be synced)
If using carousels inside of a repeater, it will mean the IDs of all the carousels is going to be changing due to how Oxygen increments the IDs inside of a repeaters. Syncing carousels is still possible in this situation, you just need to make sure that a class for the ‘Other carousel builder selector’ rather than the ID.
Parallax
Any elements inside the repeater can be set to run at slightly different speeds when the carousel is moving, allowing you to create your own parallax effect to add some depth to the carousel.
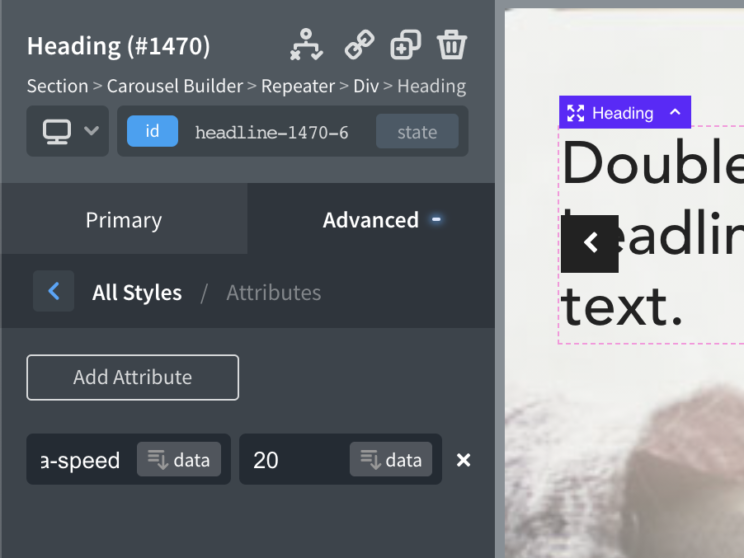
In the ‘other’ tab the parallax setting is found (only if the Repeater used). Once this feature is enabled, to change the speed of an inner element we’re making use of Oxygen’s custom attributes feature found at Advanced > Attributes.
To set the speed, enter ‘data-speed’ as the attribute name and the value as an integer. Where 1 is completely fixed and the effect is more subtle the higher the number. 20 will give a much more subtle effect.

Tips
- We recommend working primarily in edit mode so you have access to the most settings while inside the builder. Preview mode is designed to be used sparsely to ‘preview’ how the carousel will look on the front end, not as the default mode for building. Some settings such as the cell dimensions are hidden in preview mode to prevent errors & confusion.
- Turning off/on some settings will conditionally show/hide other settings. This is to ensure you are only seeing the settings that apply to the type of carousel you are building. eg if you turn on Wrap Around then the Contain setting will be hidden as this wouldn’t have any effect for a carousel with infinite cells.
- To avoid FOUC as the page loads as much as possible, make sure to set a height on the cells as well as the width. This will prevent the entire layout moving such as the navigation, the dots, and any content underneath as the carousel is built. (Update – there is now a new setting inside the performance tab, for making the carousel visible only after it’s initialized, to help prevent FOUC.)
- Make sure you’re always setting at least a width or a height for the cells. It needs at least one dimension set to be able to calculate building the entire carousel. There’s no need to try to size the carousel, apart from just setting a width if you don’t want it to take up 100% width. But other than that, the carousel will calculate the dimensions based on how you set up the cells inside.
- As a best practise, if you’re not adding overflow hidden on the carousel itself (maybe as you have the arrows needing to overflow the carousel) then add it to the section that it’s inside of. This will prevent any overflow issues as the page first loads.
Tutorials
- Colorizing active carousel cell using OxyExtras in Oxygen
- Image Gallery as a Carousel with Lightbox functionality in Oxygen
Incompatible Plugins
- Wish List for WooCommerce: Not compatible with Flickity library used in the Carousel component.
FAQs
Q: Possible to disable the carousel when all the posts are visible?
Is it possible to disable carousel controls when all posts are visible? e.g. I have a carousel with three items; on the desktop they are all visible. However, on tablets and phones I want to show 2 items and 1 item respectively. There’s no need for the carousel on the desktop. I know that it is possible to hide the prev/next arrows with CSS, however it still behaves like a carousel in that I can grab and pull it right and left.
A: Yes.
There’s a setting to enable/disable the carousel behaviour across different devices.
Carousel Builder > Carousel > Enable carousel at this break point
So in your situation, you’d want to change this to disable on desktop. Then switch to view the next screen size down, and then change it to enable.
Q: I want center-alignment, but not infinite scroll. Should the two be compatible?
A: Yes.
Yep, they’re compatible. But note that if you’re starting from cell 1, and you have center alignment, you also need to make sure that the ‘contain’ setting is disabled. Or it will remove the white space at the end of the carousel. If you need it to always look centered, then you want that space in order for that to happen.
Q: Possible to link to a specific cell?
A: Yes.
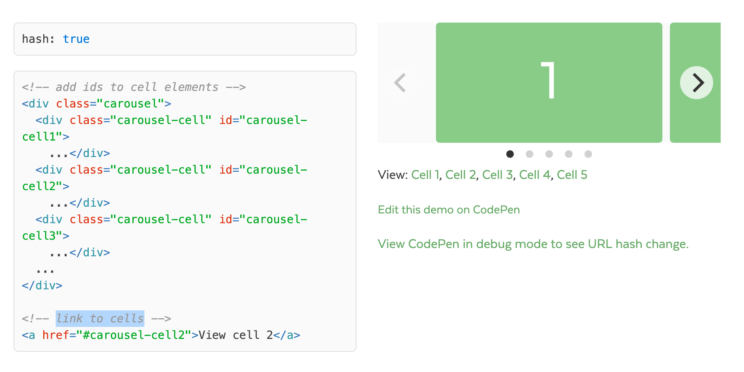
Carousel Builder > Behaviour / Interaction > Hash link to select cells: Enable.
With this in place, it is possible to link to each cell using its ID.
