OxyExtras components needed:
- Off Canvas
- Cart Counter
- Mini Cart
Steps
Edit your sitewide Main Catch All Template with Oxygen and select the container in your header row where you would like to place the Cart Counter.
Ex.:
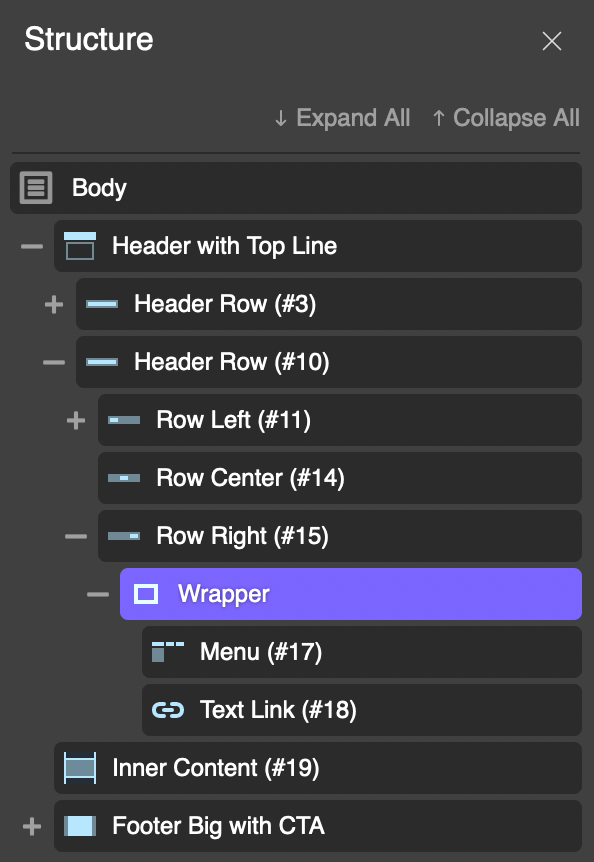
+ (Add Element) → Extras → Cart Counter.
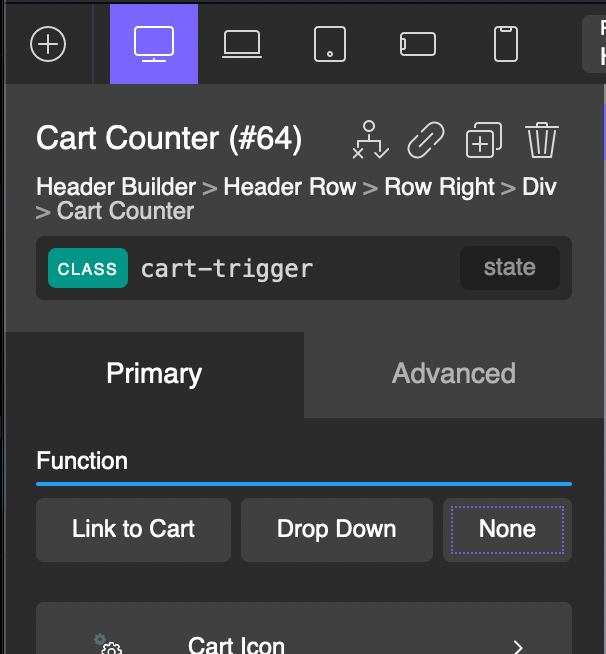
Function: None.
Advanced → Custom CSS: cursor: pointer;
Add this class: cart-trigger
Click on Body in the Structure panel and add an Off Canvas component so it is at the very end and at the root level.
You may want to increase the width from the default 280px to say, 400px.
Click selector: .cart-trigger
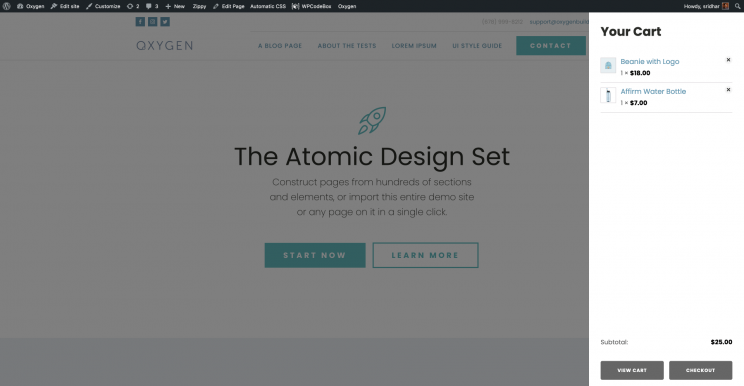
Add a Heading inside the Off Canvas that reads something like: “Your Cart”.
Add a Mini Cart component below the heading.
If you wish to have the bottom portion be positioned at the very bottom:
Set Height to 100%.
Primary → Inner Layout → Vertical Item Alignment: Space Between.
Cart Total → Spacing → Margin at the top: auto.
Add this custom CSS in a Stylesheet if you find that the content of the off canvas is not taking up the full width:
.oxy-mini-cart .widget_shopping_cart_content {
	width: 100%;
}
This tutorial provides the steps to set up a carousel with dynamic post-specific content in a lightbox using OxyExtras.
We shall set up a text link inside an Oxygen Builder‘s Repeater which when clicked displays the post title and the value of a custom field inside a Lightbox for that item (post) in the carousel.
OxyExtras components used: Carousel Builder, Lightbox.
By the end of this tutorial your page’s structure should be something like this:
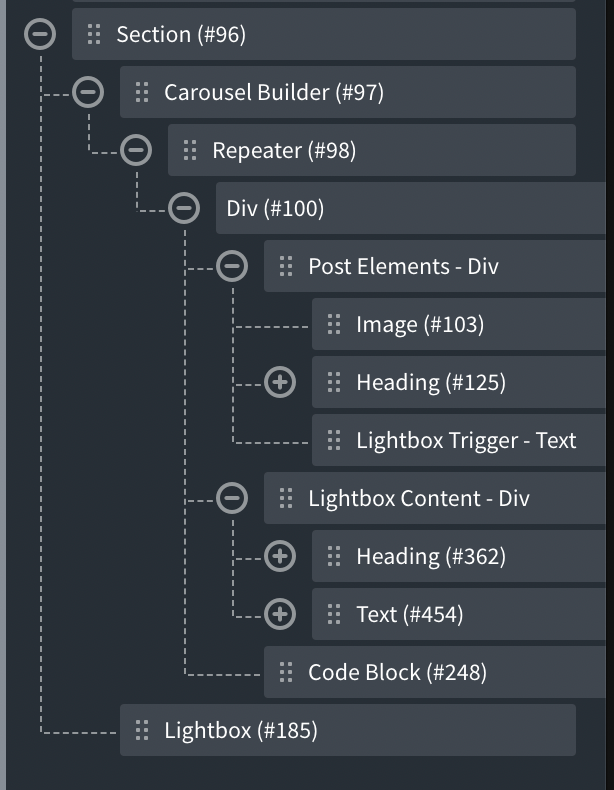
In the Oxygen editor, add a Section.
If you have not already, enable Carousel Builder and Lightbox in OxyExtras’ settings.
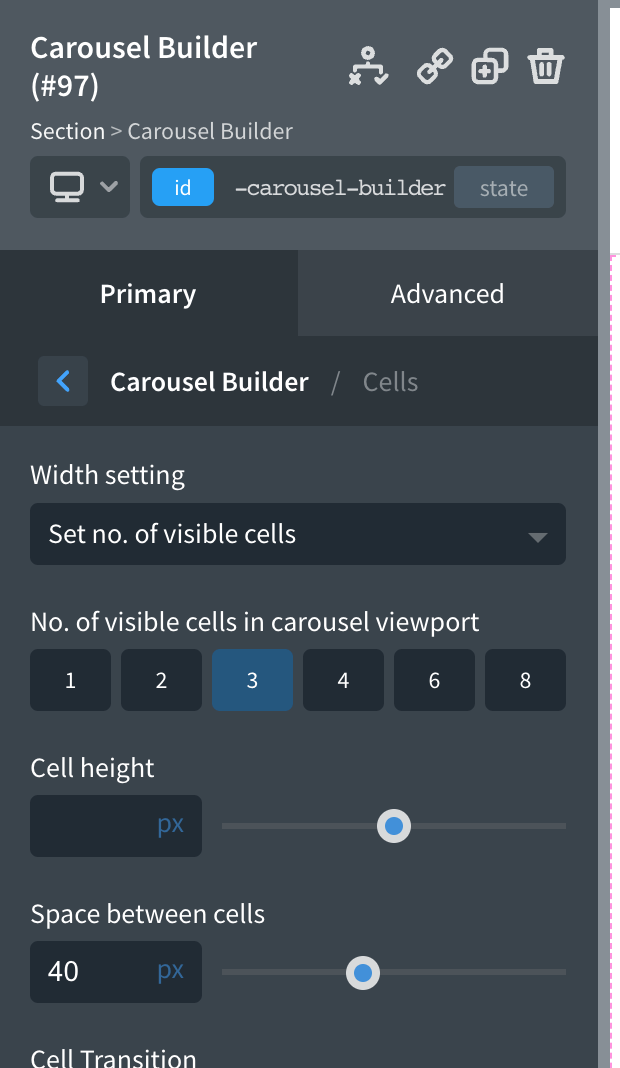
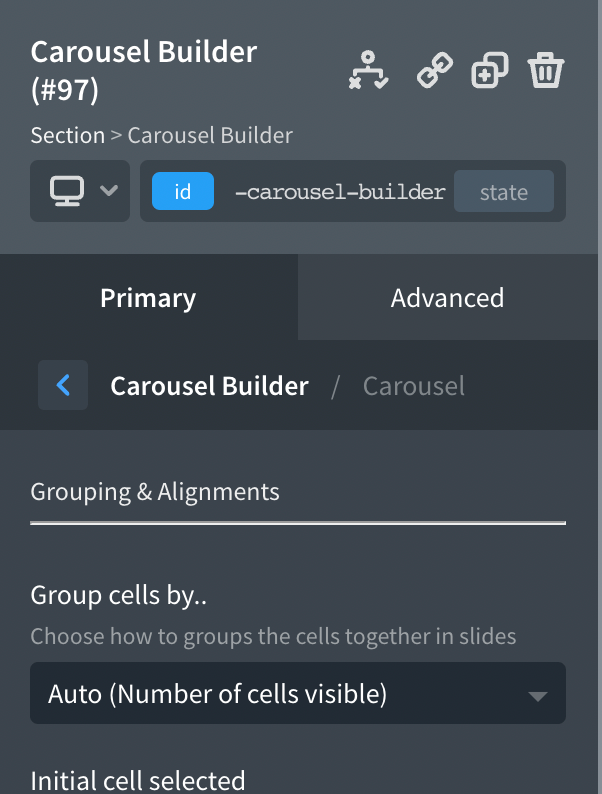
Add a Carousel Builder inside the Section.
Settings from our test page:
Add a Repeater component inside the Carousel Builder.
Set your desired query.
In our test site, it is “custom” with post Post Type and 10 Posts per page.
While it is not necessary, let’s add a Div inside the Repeater’s Div as a container for the elements that we wish to be shown for each carousel item.
In our test site, we added the post’s featured image and post title. You could link them to the post’s permalink if you wish.
Let’s add the lightbox trigger. Add a Text Link component inside the above Div (if it is NOT set as a link) or outside the above Div (if it is set as a link).
Set the link text to something like “Show more info”.
Give it a class of say, open-lightbox.
Set the URL to:
#post-[oxygen data='phpfunction' function='get_the_ID']We are setting the value of the href attribute to # followed by post- and the ID of the post.
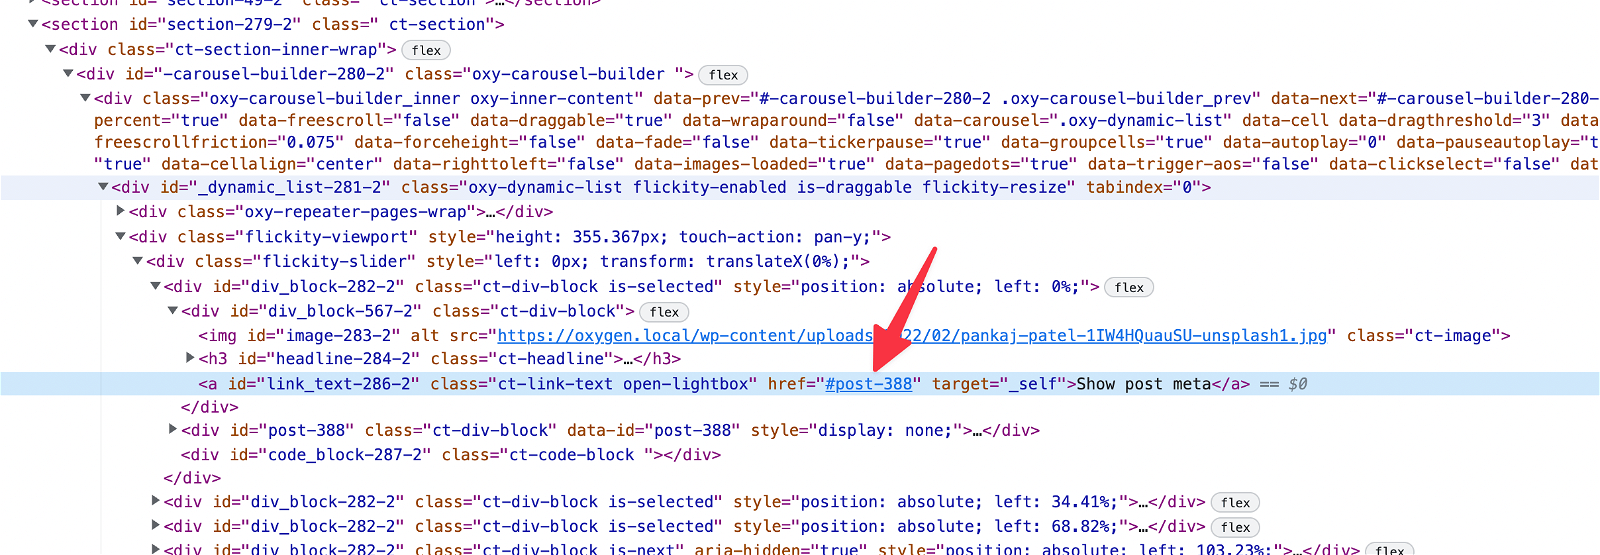
Add a Div alongside the above Div as the container for elements that we want to appear inside the Lightbox i.e., post-specific data.
We need to have the ID of this Div to be post- followed by the post ID so that clicking the lightbox trigger will show this Div inside the Lightbox for each carousel item. Since Oxygen automatically assigns an auto-generated ID to every element, we would need to come up with a workaround to replace this auto-generated ID with the dynamic post ID in the required format.
Add the following snippet using a plugin like Code Snippets on the front-end:
Title: Dynamic post ID
Code:
<?php

function wpdd_get_post_id() {
    return 'post-' . get_the_ID();
}
Back in the Oxygen editor, select the Lightbox Content Div → Advanced → Attributes → Add Attribute.
name: data-id
value: [oxygen data='phpfunction' function='wpdd_get_post_id']
Add your desired post-specific info inside the above Div. In our test page, we added the post title and a custom field (set using ACF) value.
Let’s add a bit of jQuery that will loop through all DOM elements that have data-id attribute, then grab that attribute’s value and set it as the value of ID attribute.
Add a Code Block (this could be anywhere in the structure – we added it inside the Repeater’s Div as the last item).
PHP & HTML:
<?php
	// echo "hello world!";
?>
CSS:
body:not(.oxygen-builder-body) [data-id] {
	display: none;
}
JavaScript:
jQuery(document).ready(function($){
	if($('html').attr('ng-app') == 'CTFrontendBuilder') return;

	$('[data-id]').each(function(){
		$(this).prop('id', $(this).attr('data-id') );
	});
});
Select the Section containing the Carousel Builder and add a Lightbox component so it is at the same level as or adjacent to the Carousel Builder.
Lightbox content: Manual (using links)
Link Selector: .open-lightbox
and we are done!
Pro Accordion component of OxyExtras enables you to easily set up dynamic accordions where the accordion item header text and body content can be taken from the values of custom fields that are inside a cloneable group created using Meta Box.
This article shows the steps for setting up post-specific accordions with the content coming from custom field values.
Step 1
Install and activate Meta Box and Meta Box AIO.
Go to Meta Box > Custom Fields and create a new field group.
Give it a title of say, “Post Fields”. If you are setting this up for a CPT, then something like “<CPT> fields”.
Add a “Group” type of field having the label of “Accordion”.
Tick Cloneable.
Add a Text type of sub field labelled say, “Header Text”.
Add a WYSIWYG Editor type of sub field labelled say, “Content”.
Click on Settings at the top and select your post type for the Location. It is post by default.
Step 2
Edit your posts and for each, fill in as many rows of header text + content as needed.
Step 3
Enable Pro Accordion at Oxygen > OxyExtras.
Step 4
In the Oxygen Template that applies to singular items of your post type, add a Section and inside that, Pro Accordion.
Accordion type: Accordion – Dynamic Items (Meta Box).
At Dynamic Data fill in the IDs for Cloneable group field, Header text field and Content field.
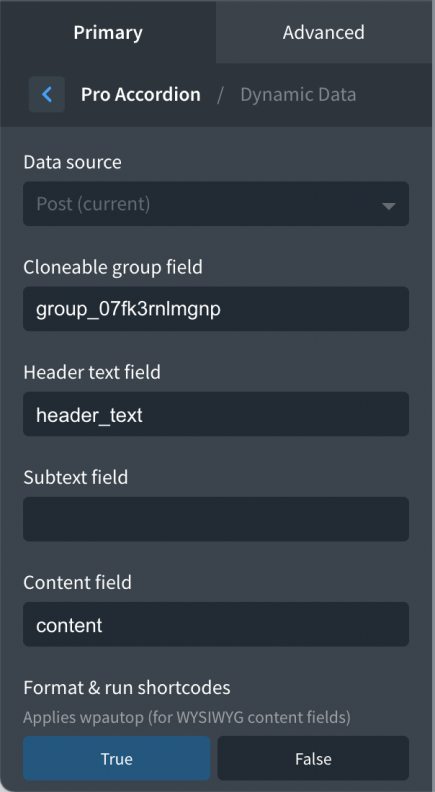
If you want the paragraphs in your WYSIWYG field, set “Format & run shortcodes” to True.
Configure the rest of the component as needed.
Lightbox component of OxyExtras has different possible content sources one of which is “Inline (elements on current page)”.
In this article we shall see how a trigger (can be any element like a button, image etc.) can be set to open a lightbox when clicked with the lightbox content being an element that is hidden on the page.
Inline has two options:
- Display elements inside the lightbox
- Another element on page
Here we are covering the “Another element on page” option.
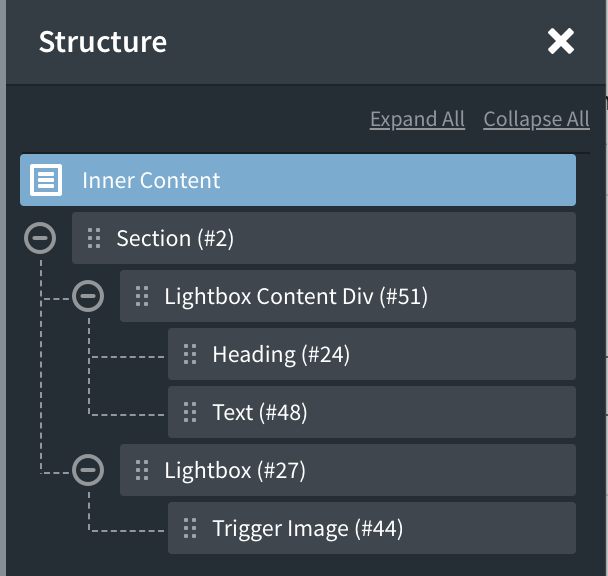
By the end of this tutorial your structure should be like this:
In the Oxygen editor, add a Section.
Add a Div. This is the container that holds the lightbox content.
In this example, you can add Heading and Text components.
Under Advanced → Layout, set the Display to none.
Add a Lightbox at the same level as the earlier Div.
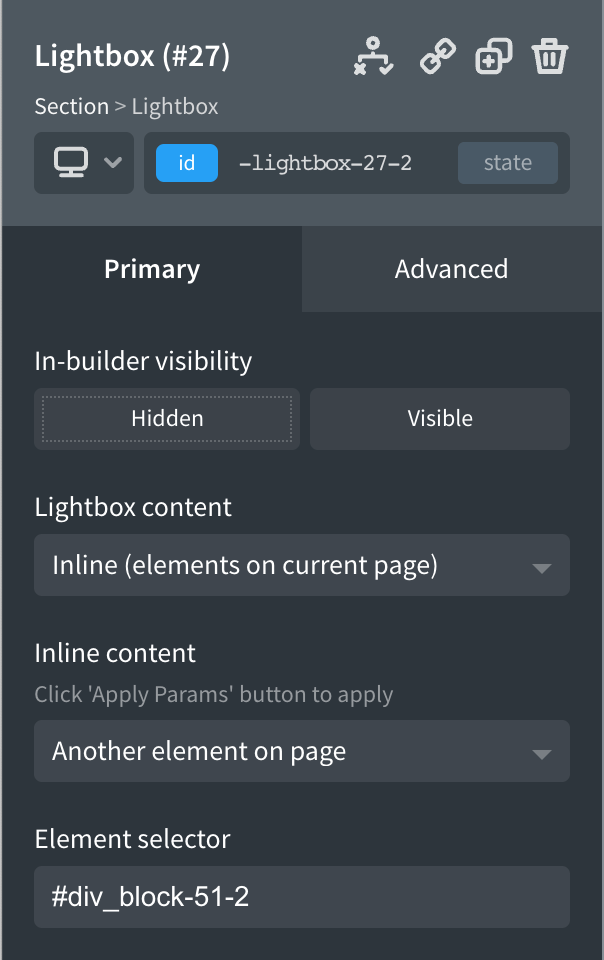
Lightbox content: Inline (elements on current page)
Inline content: Another element on page
Element selector: (ID or class of the hidden Div)
Add a button or image or any other component that you wish to use as the trigger that should launch the lightbox.
That’s it.
This article shows how it is possible to have two Off Canvas components of OxyExtras linked so they get opened and closed at the same time.
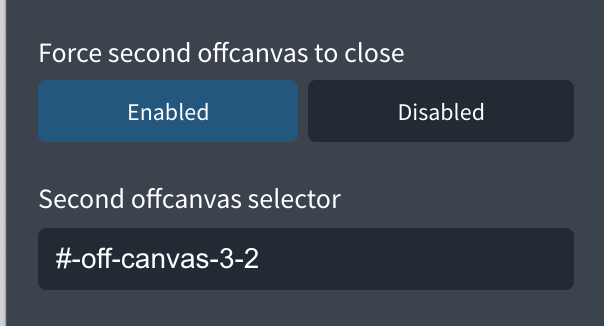
The key is to go to any one of the two Off Canvas component’s Config and select “Force second offcanvas to close” and paste the selector of the other Off Canvas.
Below are Oxygen’s shortcodes that can be pasted in a new temporary Page (with OxyExtras active and Off Canvas component enabled in its settings) if you want a copy of the demo page shown in the video:
[oxy-off-canvas ct_sign_sha256='1b6ebfb24332d65d360b39903030abcd6acdca950bbf44b3963009ceed648528' ct_options='{"ct_id":3,"ct_parent":0,"selector":"-off-canvas-3-2","original":{"oxy-off-canvas_slug_offcanvasinner_background_color":"#ffffff","oxy-off-canvas_slug_offcanvasinner_padding_left":"40","oxy-off-canvas_slug_offcanvasinner_padding_right":"40","oxy-off-canvas_slug_offcanvasinner_padding_top":"60","oxy-off-canvas_slug_offcanvasinner_padding_bottom":"40","position":"relative"},"nicename":"Left Off Canvas (#3)","activeselector":false}'][ct_headline ct_sign_sha256='33f8ad203d84fca37069ce998d6b3c8e82f80d2b8ecab67f8941870811d26d9f' ct_options='{"ct_id":5,"ct_parent":3,"selector":"headline-5-2","original":{"tag":"h2","font-size":"24"},"nicename":"Heading (#5)","activeselector":false}']Off Canvas 1[/ct_headline][ct_text_block ct_sign_sha256='81f3e4c96a9c0597f50223b81aa0e9abc3ccfe27468c4ab85acf57c18df85bea' ct_options='{"ct_id":14,"ct_parent":3,"selector":"text_block-14-2","original":{"margin-top":"20"},"nicename":"Text (#14)","activeselector":false}']This is the left off canvas.[/ct_text_block][ct_link_button ct_sign_sha256='a33a29a2c93ddee1c9aa24c5f34852d0810fa94bd0573a628fe2f42f4e8759d6' ct_options='{"ct_id":17,"ct_parent":3,"selector":"link_button-17-2","original":{"position":"absolute","top":"12","right":"12","button-style":"2","button-size":"8","padding-top":"2","padding-bottom":"2"},"nicename":"Button (#17)","classes":{"0":"oxy-burger-trigger"},"activeselector":false}']x[/ct_link_button][/oxy-off-canvas][oxy-off-canvas ct_sign_sha256='a738f228db73cbbfd8509fa7b99fa49a8fcc0d93a1822ca3d4a3b84d52fbff3d' ct_options='{"ct_id":9,"ct_parent":0,"selector":"-off-canvas-9-2","original":{"oxy-off-canvas_slug_offcanvasinner_background_color":"#ffffff","oxy-off-canvas_side":"right","oxy-off-canvas_maybe_second_offcanvas":"true","oxy-off-canvas_second_selector":"oxy_base64_encoded::Iy1vZmYtY2FudmFzLTMtMg==","oxy-off-canvas_slug_offcanvasinner_padding_left":"40","oxy-off-canvas_slug_offcanvasinner_padding_right":"40","oxy-off-canvas_slug_offcanvasinner_padding_top":"60","oxy-off-canvas_slug_offcanvasinner_padding_bottom":"40"},"nicename":"Right Off Canvas (#9)","activeselector":false}'][ct_headline ct_sign_sha256='df10f81831c147a682dc8bc6275dec291d79b75cacc1c944d4144e8687e3ac53' ct_options='{"ct_id":10,"ct_parent":9,"selector":"headline-10-2","original":{"tag":"h2","font-size":"24"},"nicename":"Heading (#10)","activeselector":false}']Off Canvas 2[/ct_headline][ct_text_block ct_sign_sha256='e1db4591b2b7562b1bb48822c914ab98114711016b1edfa8dee760cec9d68a35' ct_options='{"ct_id":21,"ct_parent":9,"selector":"text_block-21-2","original":{"margin-top":"20"},"nicename":"Text (#21)","activeselector":false}']This is the right off canvas.[/ct_text_block][ct_link_button ct_sign_sha256='672d6869f5167ebe993f6988b9ca85f6f6ea1e774dfc6331a816da120e3117e3' ct_options='{"ct_id":19,"ct_parent":9,"selector":"link_button-19-2","original":{"position":"absolute","top":"12","right":"12","button-style":"2","button-size":"8","padding-top":"2","padding-bottom":"2"},"nicename":"Button (#19)","classes":{"0":"oxy-burger-trigger"},"activeselector":false}']x[/ct_link_button][/oxy-off-canvas][ct_section_2 ct_sign_sha256='b37a9c0dc73564e506f19d166bd7ab4f7e4b30829c60fe8d940438fb8024debd' ct_options='{"ct_id":2,"ct_parent":0,"selector":"section-2-2","nicename":"Section (#2)"}'][ct_fancy_icon ct_sign_sha256='44dffe4d6a78581fec4eeb1135f792823ef97c9500843899a82a4d838124e663' ct_options='{"ct_id":8,"ct_parent":2,"selector":"fancy_icon-8-2","original":{"icon-id":"Lineariconsicon-menu"},"nicename":"Icon (#8)","classes":{"0":"oxy-burger-trigger"},"activeselector":"oxy-burger-trigger"}'][/ct_fancy_icon][ct_headline ct_sign_sha256='d046a92d975c654f7f3cb3170207ece929b3e1849017ea19e03320abd82c2924' ct_options='{"ct_id":24,"ct_parent":2,"selector":"headline-24-2","original":{"font-size":"38","margin-top":"40"},"nicename":"Heading (#24)","activeselector":false}']Demo of linked off canvas components[/ct_headline][oxy_rich_text ct_sign_sha256='918377b8d50c59e9df73a7d394bfb4704ad3b16210957b5c74bc40940ac1e906' ct_options='{"ct_id":27,"ct_parent":2,"selector":"_rich_text-27-2","nicename":"Rich Text (#27)","activeselector":false}']<ul>
<li>Clicking outside will close both the off canvases</li>
<li>Clicking any of the two close buttons inside will close both the off canvases</li>
</ul>[/oxy_rich_text][/ct_section_2]
You may have to re-sign the shortcodes in Oxygen’s security settings.
I’ve also added the following custom CSS to ensure that there is some breathing room when the admin bar is visible:
.admin-bar #link_button-17-2,
.admin-bar #link_button-19-2 {
  top: 43px;
}

.admin-bar #-off-canvas-3-2 .offcanvas-inner,
.admin-bar #-off-canvas-9-2 .offcanvas-inner {
  padding-top: 80px;
}
You will need to change the IDs for your site.
This article provides details on how to display the posts output by Oxygen‘s Repeater component as separate numbered (optional) accordion items automatically using the Pro Accordion module of OxyExtras.
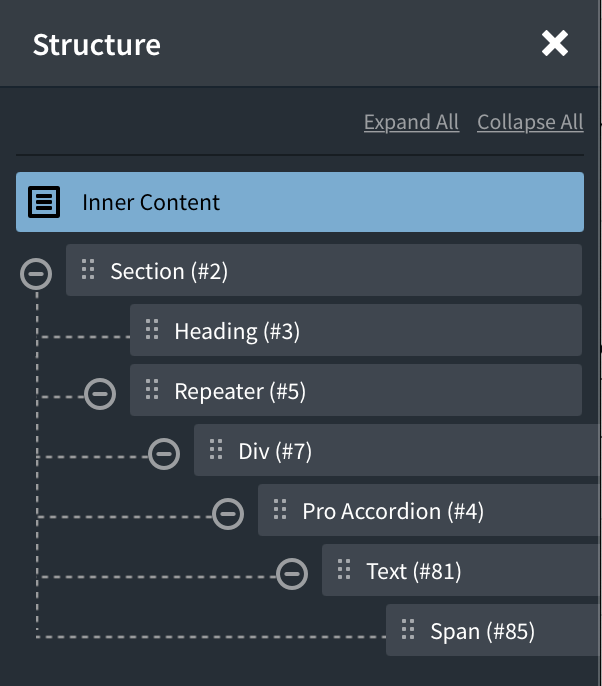
Place the Pro Accordion inside the Repeater’s Div and whatever is normally kept directly under the Repeater’s Div goes inside the Pro Accordion.
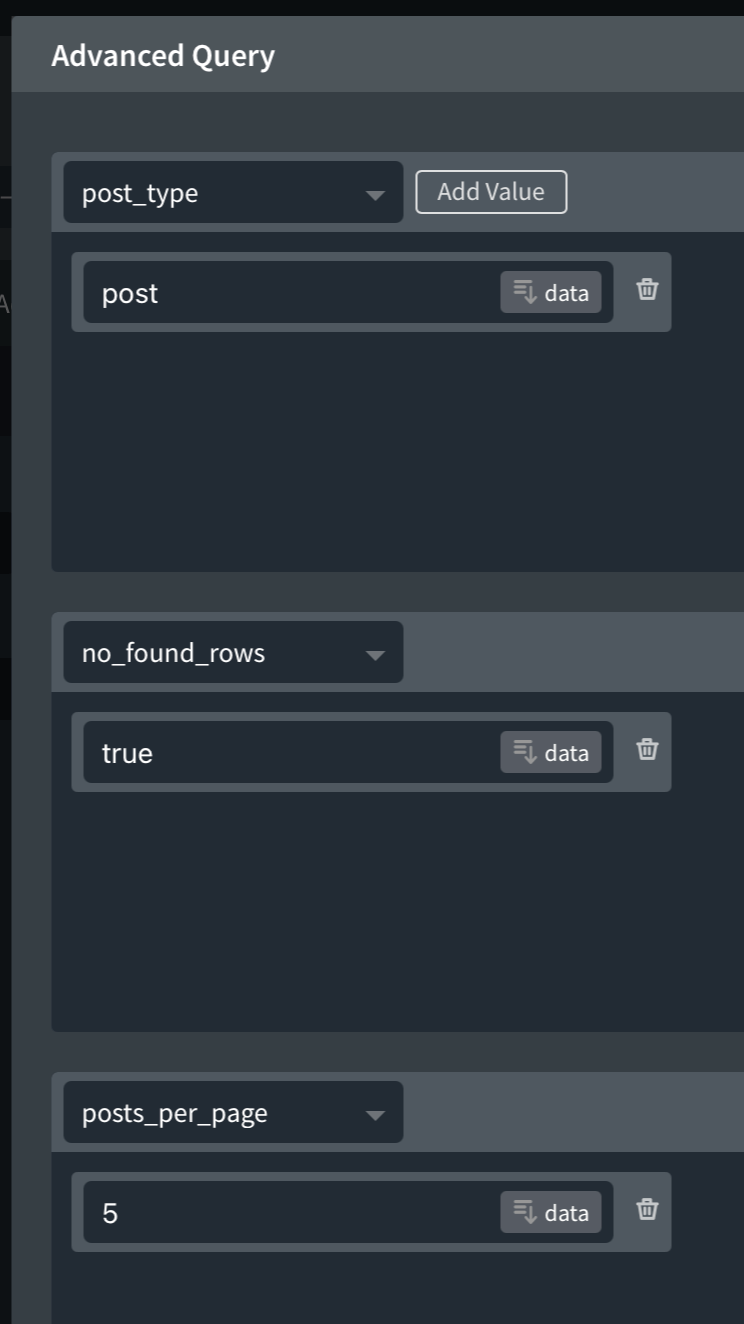
In the demo page, we have set Repeater’s query as advanced to show the 5 latest posts w/o pagination.
You may want to leave the query as default if you want this on the Posts page or on archives in the appropriate Template.
We set this up on a static Page in our demo.
Pro Accordion
Accordion type: Accordion – Individual Item (the default)
Dynamic Data > Header text > data > Post / Title.
[optional] Context Icon / Counter > Context type: Counter.
Accordion Header > Header text Typography > Font Size: 24px, Font Weight: 600.
Switch to lower breakpoints like 768px and 480px and set smaller font size as needed.
Excerpt has been set to show as the accordion content by adding a Text component inside the Pro Accordion, double clicking the default text (and deleting if using Safari), Insert Data in the top toolbar, Post / Excerpt.
That’s it. Check the page on the frontend and you should see the posts coming from the Repeater arranged neatly as individual accordion items with the post title in the header and the post excerpt in the body with smooth expand collapse functionality w/o writing a single line of code!
We recently made a change in the plugin structure by renaming plugin.php to oxy-extras.php.
This update was necessary to ensure that changelog info is not blank (going forward).
Unfortunately this means that when you update to v1.3.7, you will likely receive this error:
The plugin oxyextras/plugin.php has been deactivated due to an error: Plugin file does not exist.
You can simply ignore that and activate the updated plugin from the plugins list screen.
We are sorry about the inconvenience and this won’t happen again.
Two new components were released with OxyExtras v1.3.2, Hotspots & Popovers. They are designed to partner together mainly for creating image hotspots where you may be wishing to highlight certain features or focus the user’s attention on something in particular. See examples.
When using the popovers inside the hotspots container, they are being used as markers to place your hotspots. But.. as we’re already using the same functionality, we couldn’t resist building in the settings to provide a way to use these same popovers to add popovers to any other elements on the page.
Adding Popovers to Other Elements
With popover being its own component, the idea is that we can build it, style it, configure the animation all within the component settings and then use it elsewhere on the page.
To attach the popover to a particular element, we can provide a selector (the class or ID) for the element(s) that we wish to apply it to. Here we’re just using the class ‘button’.
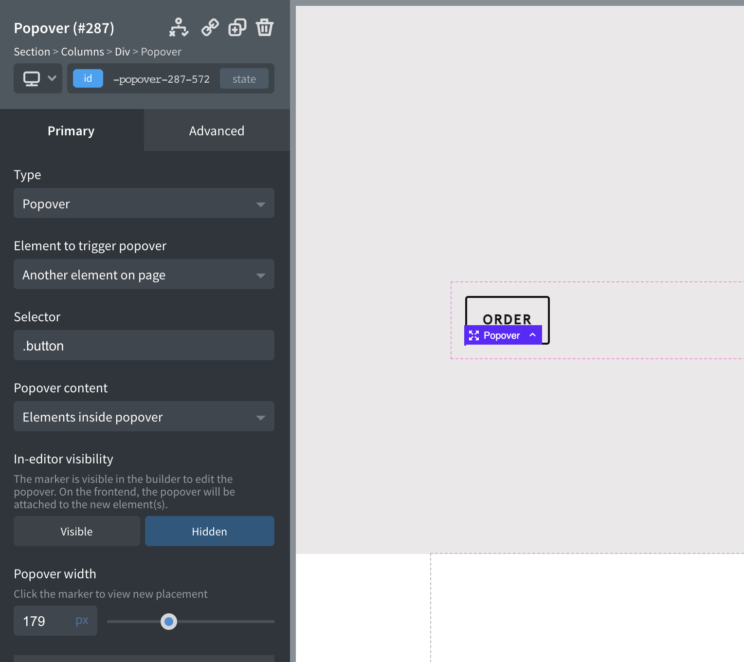
By being able to choose an element or elements by selector, it means we can also add popovers to anything we like, even selectors that are targeting things inside of other components.
Adding content inside the popover
The dropdown ‘Popover content’ in the settings has two options when it comes to adding content to the popover. You can either build it using Oxygen components inside the popover or add the content via HTML attribute to the element itself.
If you’re only intending on adding text inside the popovers, one benefit of doing it via attributes is that you could use one popover component across multiple elements on the page. The content would then be added dynamically using the attribute found on each element.
For example, if you have a button which you’re adding a popover to when it’s hovered, you’d set up the popover as seen above, but instead of dragging elements inside for adding the content, you’d go to the button component which is being targeted and add your attribute name ‘data-tippy-content’ with your content as the attribute value.
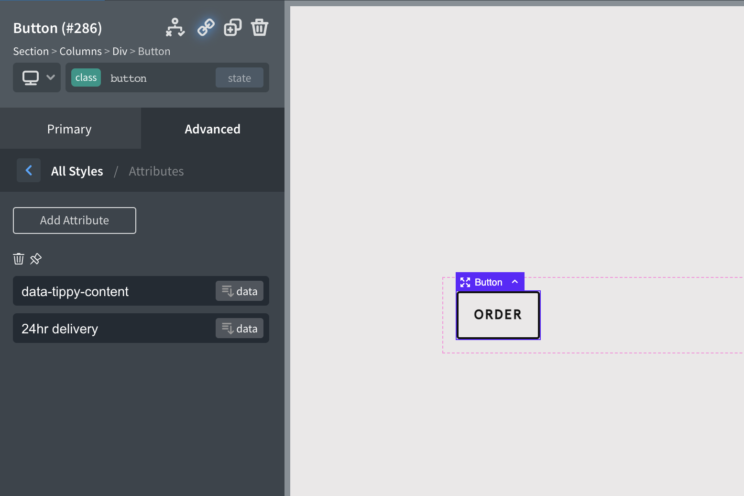
You could then do the same for multiple buttons on the page with this same ‘button’ class, but just a different attribute value for each one.
As attributes allow dynamic data, it opens up lots of possibilities of what data could be showing inside of the popover. Pricing, availability for a particular product, user info.. etc. It also means we can use the popovers inside of repeaters, as each element will have different dynamic data coming from that particular post.
WPGridBuilder has recently added further support for Oxygen by adding some new components for adding both Facet’s & Grids. It means we no longer need to add shortcodes and makes it a bit more convenient to work when inside the builder, especially when using together with Repeaters or Easy Posts.
WPGridBuilder with Repeaters
If you’re using a repeater for your posts and using WPGridBuilder to filter and add more posts, one thing you may notice is that if you’re adding some dynamic Oxygen components that use JS inside of the repeater or are adding your own with code blocks, the new content that is appended onto the page may not pick up the same functionality. You may need to adapt your code slightly to account for new elements that didn’t exist on the page when the page first loaded.
This is the case with both the Lightbox & the Read More / Less components.
WPGridBuilder documentation provides JS events that trigger when specific things occur. We can use the event ‘appended’ to listen for when the facets have been used to append new content inside the repeater and make surer these components function as they’re supposed to.
Support for Lightboxes & Read More components
You can add the following code to a code block. (Make sure the code block isn’t actually inside of the repeater that WPGridBuilder is using)..
window.WP_Grid_Builder && WP_Grid_Builder.on( 'init', onInit );

function onInit( wpgb ) {
    wpgb.facets.on( 'appended', onAppended );
}

function onAppended( content ) {

    /* Lightbox */
    if (typeof doExtrasLightbox == 'function') {
    	doExtrasLightbox(jQuery(content));
    }

    /* Read More / Less */
    if (typeof doExtrasReadmore == 'function') {
    	doExtrasReadmore(jQuery(content));
    }
}
Should this just be built-in?
If WPGridbuilder starts to gain a lot of popularity for OxyExtras users (they’re currently offering Oxygen users a discount for their LTD), it may be a good idea in the future to add support for it out of the box. For now, as there are a few different methods for adding Oxygen components to a page dynamically, the priority was to make sure there was a way to use these components in AJAX loaded content regardless of which method you’re using.
These two new functions doExtrasLightbox($content) and doExtrasReadmore($content) provide a way to do that. You just need to pass the new AJAX-loaded content as the parameter ($content).
doExtrasLightbox(jQuery('.my-new-content'));Where you add this will depend on the plugin you’re using to add the content, you’d need to refer to the plugin documentation.
Note – if you’re using our own Infinite Scroller component, then this is already working out of the box.
The carousel builder has been designed to accommodate many use cases and as a result, there may be settings or workflows that may not immediately make sense depending on what you’re trying to build.
A common confusion has been in setting the heights and widths with users sometimes running into issues where either the content is overflowing, or elements are being stretched.
The first thing to note is that apart from adding a width (if you want to shrink the carousel viewport to a specific width) there isn’t any need to try to adjust the styles of the carousel itself. It’s all about creating the carousel by styling the cells and choosing how the carousel behaves in the settings. The carousel, on the front end, will then use that information to build the carousel and set it’s height etc dynamically.
Regarding sizing the cells themselves.. there are different ways to go about it depending on the type of carousel you’re building..
Content slider, Testimonials etc
For these types of content carousels, the recommended workflow would be to set a cell width only, either by defining the width as a percentage or another unit, or choosing the number of cells you want visible inside the carousel.
By leaving the height blank, the cells will just naturally fit the content inside and the carousel will take the height of the cell with the largest height. If there’s a noticeable difference in heights between the cells, due to the content, there are two options available..
- Force the carousels to be equal heights. – This will make sure each cell has exactly the same height as the tallest cell. The benefit of this approach is that the carousel will feel stable as it moves. The negative is this is that if there is a significant difference in heights, there will be gap between the content and the page dots.
- Adaptive heights – This will make sure the carousel adjusts it’s overall height based on the currently selected cell. The benefit is there’s never going to be a gap. The negative is that it will be moving the content of the page below it due to the element changing height dynamically.
By not setting a height, you will avoid the same issue that setting a height would cause in lots of other situations in building responsive website – that the content will overflow the fixed height that you’ve set.
Image Galleries
Unlike content sliders, galleries have a unique problem when the images all have different dimensions. How to set a cell width or cell height when you don’t know what the width and heights of the image in the gallery will be? Which to prioritise?
In my opinion, galleries work better in the complete opposite way than standard content.
With responsive sites, we’re generally concerned with width of elements more than heights. We allow the content to flow naturally down the page without concern of the height of the containers or the page itself. (How often have you used the max-height media query compared with the max-width? Probably never.)
But with carousels, the content is being experienced horizontally, not vertically. With image galleries having no vertical content at all, the width of the carousel and the cells are usually not a concern, with the height being the priority and the widths just being automatically sized based on the aspect ratio.
With galleries in the carousel builder,we can choose to do it three different ways;
Prioritising the Heights
Here we are setting a height and leaving the widths blank. The result is the carousel will fit neatly into the area, the different aspect ratios of the images isn’t a concern as they will just fit naturally horizontally as the widths are auto.
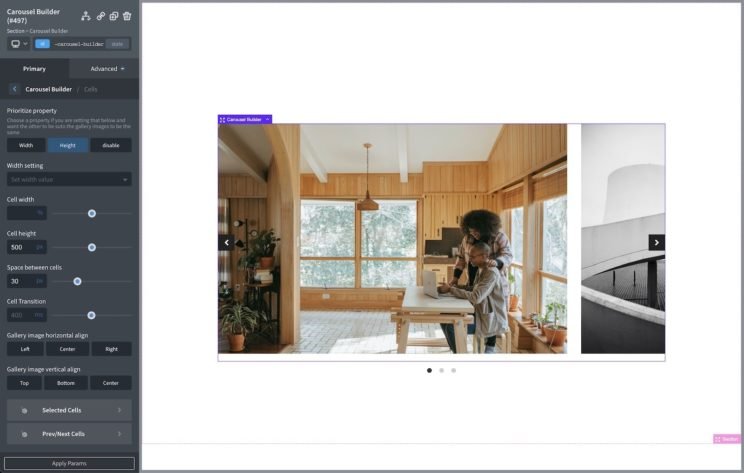
Prioritising the Widths
Here we are choosing the number of cells to be exactly three visible inside the carousel viewport. We can see the images have different dimensions so they are now different heights. The carousel will take the height of the very largest cell. We can set the vertical alignment of the images to be centered, top or bottom.
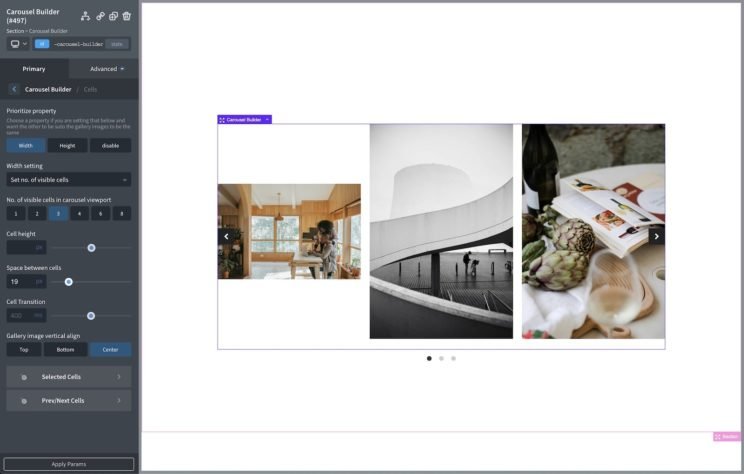
Prioritising disabled.
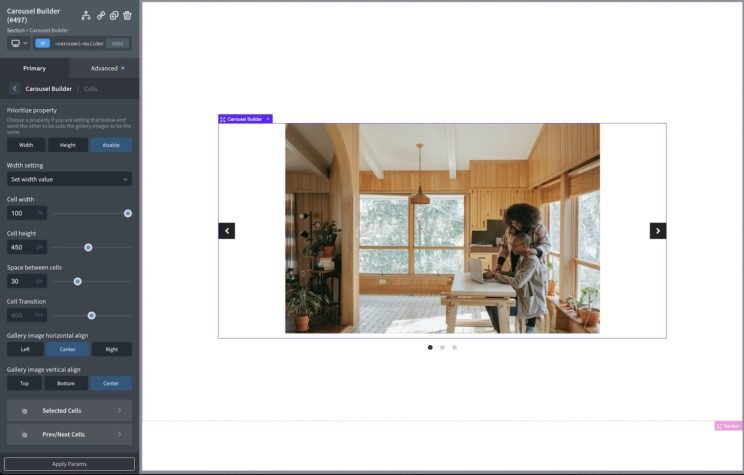
Sometimes you may need the gallery to fit a very particular height/width to fit into a specific layout. The issue when giving a fixed width and height is that the image could stretch to fit the cell size. There are two options to solve it.. either aligning the image inside of the cell or changing the object-fit.
This first example shows that we’re centering the images inside of the cell. The result is each image will take up the same height, but the width will change within the cell and we center align it. The cells are 100% width, but each image inside will have it’s own width. The benefit here is the original aspect ratio of each image is preserved.
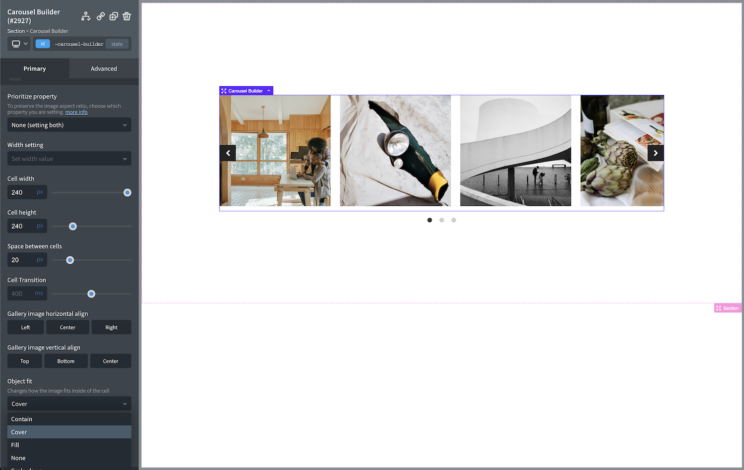
This second example is using the new object-fit setting. If you wish to set both height and width and wish to crop the images to make sure they fit into the entire area.
Here we’re setting both the width and the height as 240px to create a square, and then to avoid the image stretching we’re setting the object-fit property to ‘cover’. It will then make the images act more like background images and cover the square.
There has been a fairly big changelog for v1.3.2, new components, new features, a few bug fixes from previous components.
A changelog can be useful, but here are a few highlights with some more information about some of the changes and new features…
Mega Menu can be used in any Custom Headers
Up until now, the mega menu has been built more as an extension to the header builder, mainly to ensure consistency by always functioning inside the same structure.
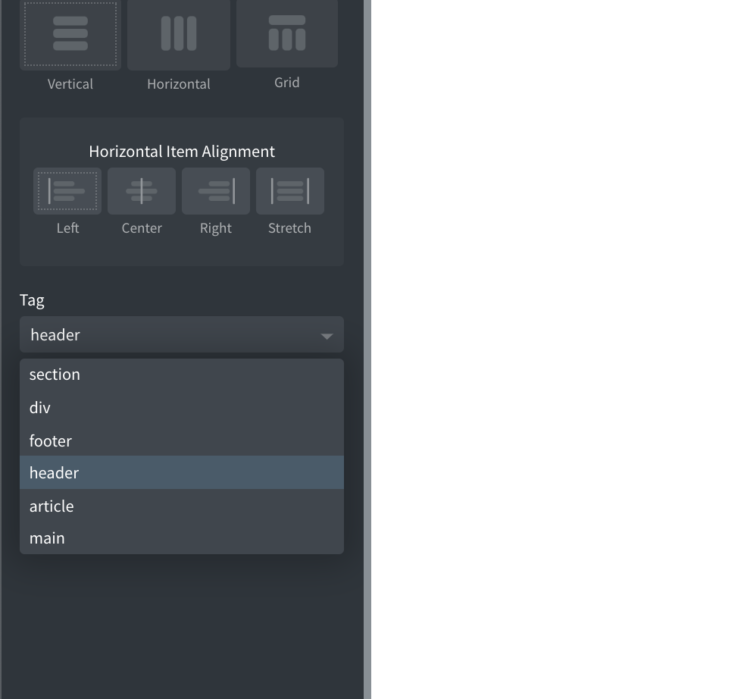
We’ve now added support for being able to use inside any header. The mega menu component now appears inside the Extras component list as any other component. The only thing that is needed from the div or section that you are using to build your custom header is to ensure it has a ‘header’ tag (but you were doing that anyway, right?)
Carousel Builder Gallery improvements
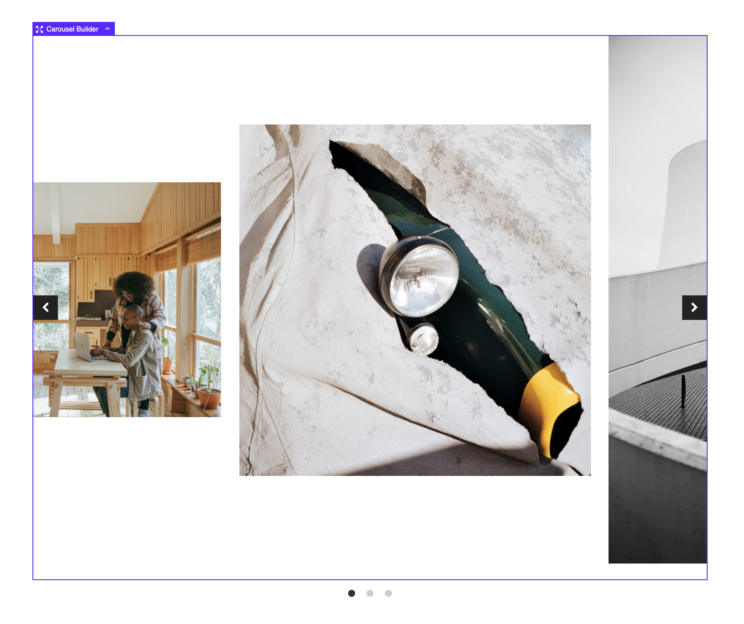
The carousel gallery feature has had a few improvements. You now change the alignments of images inside of the cells. Up until now the cells would just be the same heights & widths of the images inside. This is useful for when you wish to specify both the width & heights, this gives a way to do so without stretching the images inside.
If you’re unsure of exactly how the height / widths and alignments for the gallery works. Take a quick read through cell dimensions explanation.
There’s also an improvement on the fullscreen mode for galleries, where you can now choose to preserve the aspect ratio. So instead of keeping the same widths as set in the carousel cell settings, when in the full screen mode, the actual cells will jump to 100% and 100% fullscreen, whilte the images inside will fit with their original aspect ratio.
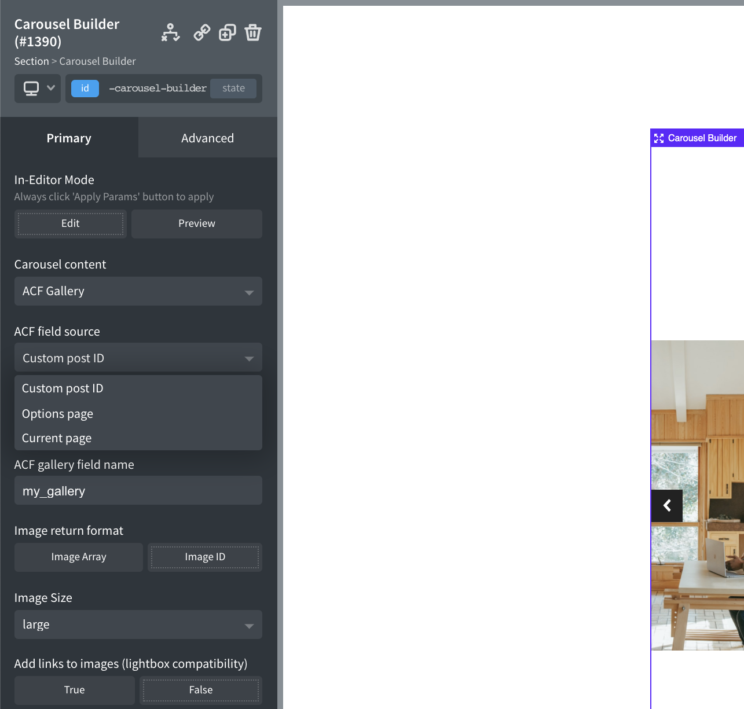
ACF gallery source
The ACF gallery images can be now be used to fetch ACF galleries from other pages or options page by changing the ACF field source.
Lastly, regarding the carousel, full support has been added for using Carousels inside of repeaters. So if you have ACF galleries inside post types and are using the repeater to show the posts, you can use a carousel inside that CPT repeater as you would anywhere else on the page.
Lightbox & Read More
Some users were needing to use some components inside AJAX loaded content on the page. Namely inside repeaters that are inside of the Infinite Scroller component or by using a third-party plugin such as WPGridBuilder, FacetWP etc.
With AJAX loaded content, often you need to retrigger some of the JS when the new elements are added, as the elements didn’t exist on the page when the page first loaded.
The main two components where this was an issue, was the Lightbox & the Read More component. We’ve now adapted these components to work out of the box when inside the Infinite Scroller. For using them inside AJAX loaded content via WPGridBuilder see Using WPGridBuilder facets with OxyExtras components.
New Components – Hotspots & Popovers
Two new components are popovers & hotspots. These are two seperate components that can be used together to create image hotspots or the popover component can be used seperately by itself.
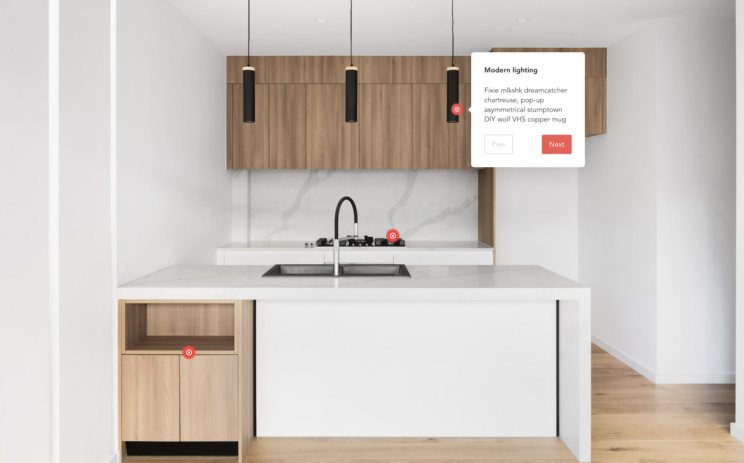
By adding the popovers inside of the hotspot container, they can be used as markers to highlight certain points on images, carousels or any elements with a fixed aspect ratio (still videos?)
The documentation will cover all the functionality & settings, we’ll write up a tutorial showing some of the use cases. For now, here are some highlights;
- Users can navigate between hotspots using custom prev/next buttons inside the popovers, for creating product tours.
- Build reveal animations using transforms visually inside Oxygen.
- Both positioning of the popovers and the placement of the popup can either be set manually in Oxygen or can be linked to dynamic data for easier client editing.
- Supports ACF: Image Hotspots Field to allow clients to visually apply the positioning on the image from the post edit screen.
- The popover component can be used by itself to add buttons or icons anywhere on the page for the user to click to reveal a popover.
- The popover component can also be used to add popovers/tooltips to multiple elements on the page. You can choose the selector & either add content by adding elements inside the popover, or use attributes. (Tutorial coming up to explain)
When you install OxyExtras, you might have noticed that none of the components are enabled out of the box.
Update: If you’re running Oxygen v3.8+ this is very unlikely to be an issue as this was addressed in the v3.8 update.
It is strongly recommended to only enable the components that you actually want to use and keep others disabled.
Note that we are talking about the number of components being available in the +Add panel of Oxygen, not the number of elements in the page Structure.
The reason for this is due to the way shortcodes are parsed by an internal WordPress function and the way Oxygen processes shortcode depth. Oxygen team is looking into ways to fix this.
Note – you’re unlikely to actually come across any issue unless you are using multiple addons, meaning you would be having large numbers of active component at one time. But for best practice, disabling the components you won’t be using is recommended.
To open up as many uses as possible, in some of OxyExtras components you’ll find a ‘manual’ or ‘custom’ setting that allows you to take advantage of the provided functionality outside of the pre-configured options.
With the lightbox component, it can be found within the lightbox content dropdown. It’s ‘manual’ because you’re no longer specifying the content from within the lightbox settings, it’s done manually from the links on the page using the ‘href’ attribute.
In other words, the lightbox will find the links and use the href attribute to determine the content to display. The link could be to an image, a youtube video, a URL to another page, a link to a PDF file etc etc.
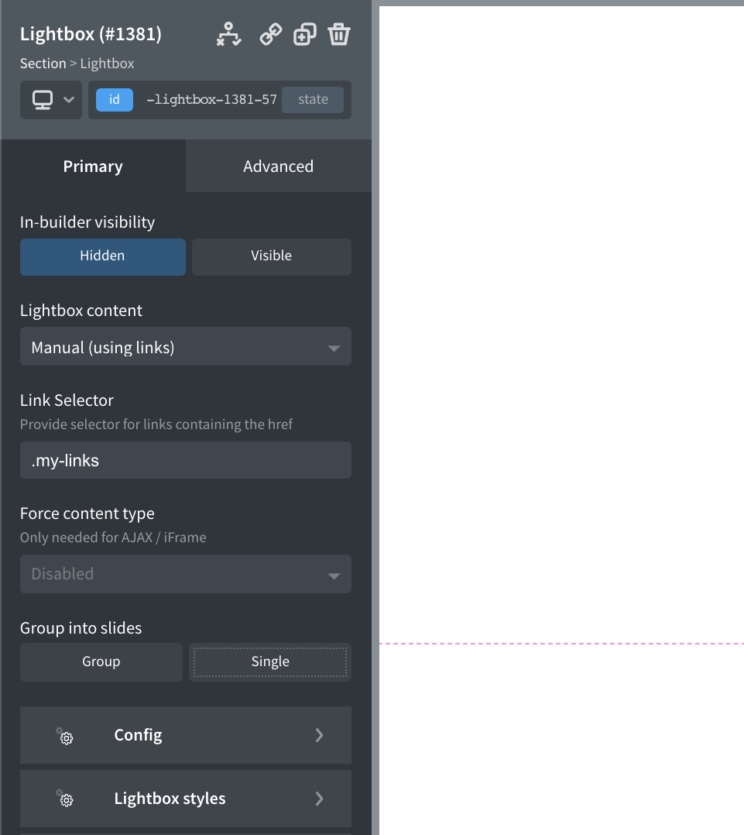
When to use Manual Mode
There are many situations where the links that you wish to use as the click triggers to pop open the lightbox don’t exist as Oxygen components. Instead, they are inside existing structures or inside of other components.
For example;
- Inside of an Easy Posts loop
- Inside of a carousel when displaying a gallery
- Inside the post content in Gutenberg blocks.
- From custom code inside of a code block
- Markup from plugins using shortcodes.
In these examples, we may have control over the markup of the links but we have no way to wrap the lightbox around them like we would with a typical Oxygen element that we’re wishing to use as the click trigger.
How to use Manual Mode
With manual mode, the only things we need is to know is the selector for the links and the type of content we are trying to display.
Here is a common example;
Adding a Lightbox to a Gallery Carousel
With the carousel builder, we’re often building by placing elements inside of the carousel, so we can usually place a lightbox inside without issue.
The exception to this rule is when adding galleries. In this case, we just set up where the gallery is coming from and the carousel will automatically output the images for us.
There is a setting for add links to these image, for the purpose of being able to use with the lightbox component.
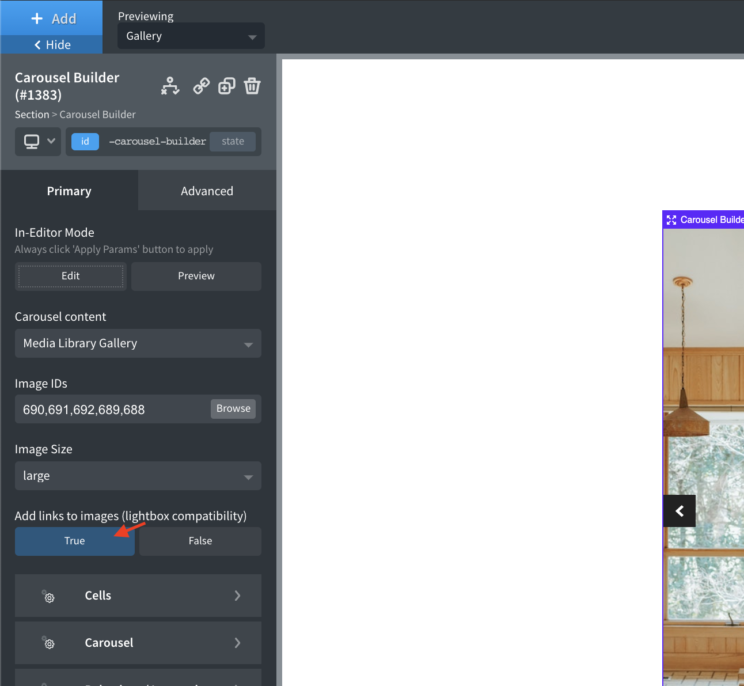
Now the carousel gallery images will be wrapped in links.
In order to add a lightbox to these links, we can place a lightbox component anywhere on the page (ideally just underneath if you like to keep things organised) and set to manual.
The class for the links in the gallery, which can be found by inspecting the page, is ‘oxy-carousel-builder_gallery-image’. We’ll give our carousel a class as well, to make it unique from any other carousels we may have on the page ‘my-carousel’.
Now we can add our link selector in the lightbox settings to make sure it targets just these links. The full selector would be ‘.my-carousel .oxy-carousel-builder_gallery-image’.
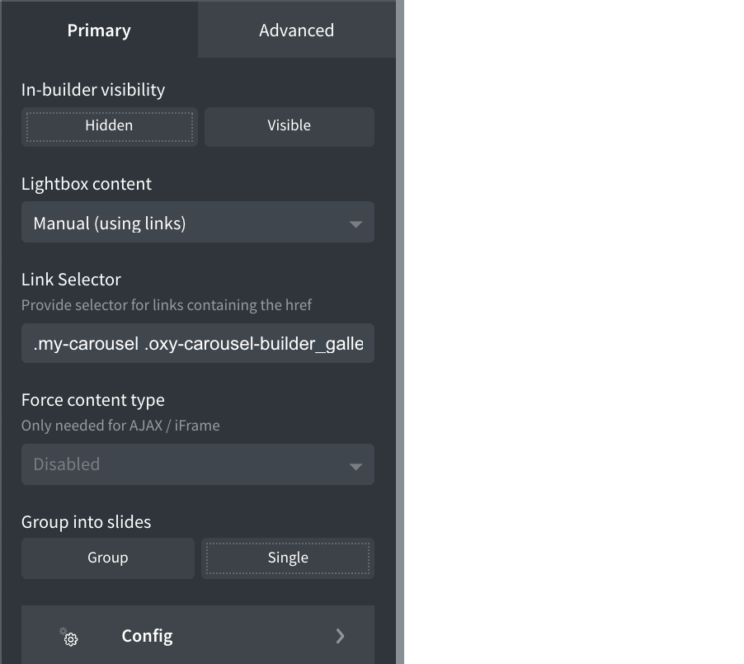
That’s it. Now when these links are clicked, it will load up the lightbox with the images.
It would be the same workflow for links inside of an Easy Posts or a code block. You can give the links any class you want, and then use that class as the link selector to tell the lightbox which links to look out for.
Here’s another example;
Adding a Lightbox to the Products List Component
In the Oxygen Woocommerce addon, we can loop through the products using the Products List component. It’s a convenient component for quickly building product grids, but unlike the repeater, we don’t have direct access to the individual elements inside the component.
So.. if we wanted to add a lightbox to show some content from the product page, for eg, this is where the manual mode could be helpful.
The Products Lis component already has links to the product page wrapped around both the product image and the product title. Clicking these would usually take the user to the product page.
We could use either of those links to be the click triggers so that instead of taking the user to the actual product page, the lightbox would be loaded up instead showing the product info or whichever part of the page we want.
We can find the selector for the link easily by using Chrome dev tools. The class that is added to the image link in this case is ‘woocommerce-loop-product__link’.
Let’s use that in a lightbox..
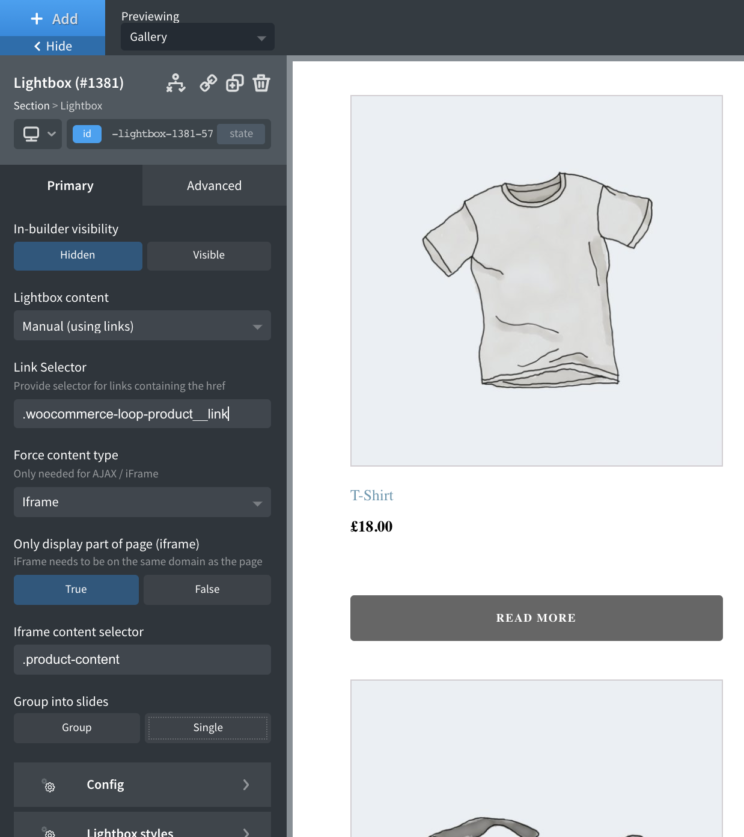
That’s it. Now if the user clicks the image link inside the products list component, it will now open up a lightbox showing the contents of that page (or part of the page, depending how you configure it)
The only difference with this second example is that because the link are pointing to another page, (not an image or video) we just need to use the force content type to tell the lightbox whether we want to use AJAX or iFrame as the method for fetching the content.
This tutorial provides the steps to set up a mobile responsive menu in Oxygen’s header using Burger Trigger and Slide Menu components of OxyExtras.
Step 1
If you have not already, enable Burger Trigger and Slide Menu components in OxyExtras’ settings.
Step 2
Edit your site wide Main catch all template with Oxygen.
Manual setup instructions follow. 1-click paste codes are provided near the end.
Add a Header Builder component if there’s not one already.
Add a Header Row with your logo at the left and Menu component at the right, if not already present.
Add a Burger Trigger component in Row Right below the Menu.
Burger Scale: 0.7.
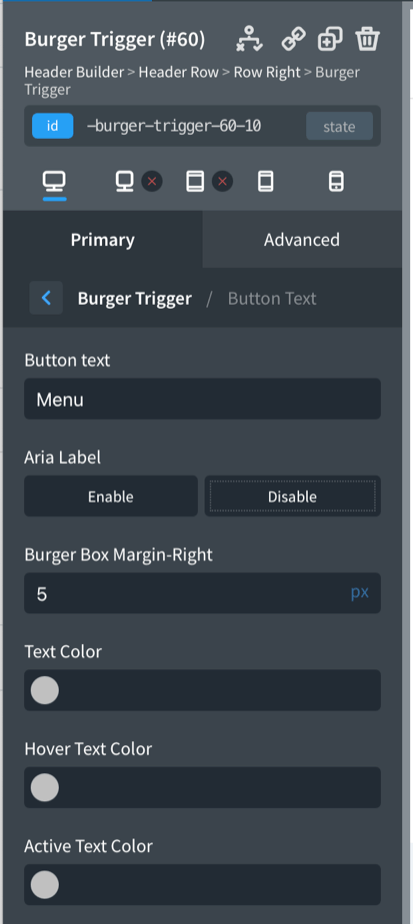
Since we want this to only appear at a lower breakpoint, set its display to none (Advanced > Layout).
Decide on the breakpoint at which you would like the (expanded) menu to collapse to a hamburger. Let’s say it is 1120px. Switch to this breakpoint and set the display of Menu to none and display of Burger Trigger to block.
Add another Header Row and add a Slide Menu component in the center row. Select your menu if you have multiple. Set width to 100%.
Settings from the demo site:
1120px breakpoint:
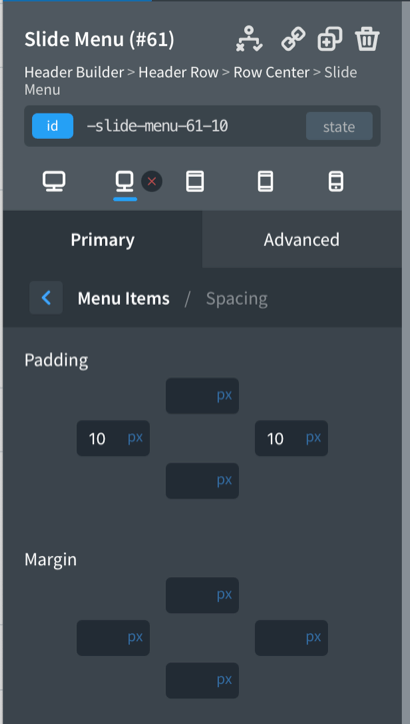
Set “State on page load” to Hidden.
That’s it!
If you would like to paste the entire pre-built Header Builder from the demo site, install Hydrogen Pack or Hydrogen Paste, copy the code below and paste in your Template.
eyJzb3VyY2UiOiJodHRwczovL3NsaWRlbWVudS53cGRlbW8uZGV2IiwiY29tcG9uZW50IjpbeyJpZCI6MiwibmFtZSI6Im94eV9oZWFkZXIiLCJvcHRpb25zIjp7ImN0X2lkIjoyLCJjdF9wYXJlbnQiOjAsInNlbGVjdG9yIjoiX2hlYWRlci0yLTIyNSIsIm9yaWdpbmFsIjp7InN0aWNreS1tZWRpYSI6InBhZ2Utd2lkdGgiLCJzdGlja3lfc2Nyb2xsX2Rpc3RhbmNlIjoiMzAwIiwicGFkZGluZy10b3AiOiIxMCIsInBhZGRpbmctYm90dG9tIjoiMTAiLCJib3JkZXItdG9wLXdpZHRoLXVuaXQiOiIiLCJib3JkZXItcmlnaHQtd2lkdGgtdW5pdCI6IiIsImJvcmRlci1sZWZ0LXdpZHRoLXVuaXQiOiIiLCJib3JkZXItdG9wLXdpZHRoIjoiMCIsImJvcmRlci1yaWdodC13aWR0aCI6IjAiLCJib3JkZXItYm90dG9tLXdpZHRoIjoiMSIsImJvcmRlci1sZWZ0LXdpZHRoIjoiMCIsImJvcmRlci1ib3R0b20tY29sb3IiOiIjZGRkIiwiYm9yZGVyLWJvdHRvbS1zdHlsZSI6InNvbGlkIn0sImFjdGl2ZXNlbGVjdG9yIjpmYWxzZSwibmljZW5hbWUiOiJIZWFkZXIgd2l0aCBUb3AgTGluZSIsIm1lZGlhIjp7InBhZ2Utd2lkdGgiOnsib3JpZ2luYWwiOnsicGFkZGluZy10b3AiOiIxOCIsInBhZGRpbmctYm90dG9tIjoiMTgifX19fSwiY2hpbGRyZW4iOlt7ImlkIjoxMCwibmFtZSI6Im94eV9oZWFkZXJfcm93Iiwib3B0aW9ucyI6eyJjdF9pZCI6MTAsImN0X3BhcmVudCI6Miwic2VsZWN0b3IiOiJfaGVhZGVyX3Jvdy0xMC0yMjUiLCJvcmlnaW5hbCI6eyJzdGFjay1oZWFkZXItdmVydGljYWxseSI6InBob25lLXBvcnRyYWl0In19LCJjaGlsZHJlbiI6W3siaWQiOjExLCJuYW1lIjoib3h5X2hlYWRlcl9sZWZ0Iiwib3B0aW9ucyI6eyJjdF9pZCI6MTEsImN0X3BhcmVudCI6MTAsInNlbGVjdG9yIjoiX2hlYWRlcl9sZWZ0LTExLTIyNSJ9LCJjaGlsZHJlbiI6W3siaWQiOjEyLCJuYW1lIjoiY3RfbGluayIsIm9wdGlvbnMiOnsiY3RfaWQiOjEyLCJjdF9wYXJlbnQiOjExLCJzZWxlY3RvciI6ImxpbmstMTItMjI1IiwiY2xhc3NlcyI6WyJhdG9taWMtbG9nbyJdLCJvcmlnaW5hbCI6eyJ1cmwiOiIvIiwidXJsX2VuY29kZWQiOiJ0cnVlIn0sIm1lZGlhIjp7InBob25lLWxhbmRzY2FwZSI6eyJvcmlnaW5hbCI6eyJtYXJnaW4tdG9wIjoiMTIiLCJtYXJnaW4tYm90dG9tIjoiMjQifX19LCJhY3RpdmVzZWxlY3RvciI6ImF0b21pYy1sb2dvIn0sImNoaWxkcmVuIjpbeyJpZCI6MTMsIm5hbWUiOiJjdF9pbWFnZSIsIm9wdGlvbnMiOnsiY3RfaWQiOjEzLCJjdF9wYXJlbnQiOjEyLCJzZWxlY3RvciI6ImltYWdlLTEzLTIyNSIsIm9yaWdpbmFsIjp7InNyYyI6Imh0dHBzOi8vYXRvbWljLm94eS5ob3N0L3dwLWNvbnRlbnQvdXBsb2Fkcy9zaXRlcy80MS8yMDE4LzAzL294eWdlbi1sb2dvLWJsdWUucG5nIiwiaGVpZ2h0IjoiMzAifSwiY3RfY29udGVudCI6IiJ9LCJkZXB0aCI6ZmFsc2V9XSwiZGVwdGgiOiIyIn1dLCJkZXB0aCI6MX0seyJpZCI6MTQsIm5hbWUiOiJveHlfaGVhZGVyX2NlbnRlciIsIm9wdGlvbnMiOnsiY3RfaWQiOjE0LCJjdF9wYXJlbnQiOjEwLCJzZWxlY3RvciI6Il9oZWFkZXJfY2VudGVyLTE0LTIyNSIsImN0X2NvbnRlbnQiOiIifSwiZGVwdGgiOjF9LHsiaWQiOjE1LCJuYW1lIjoib3h5X2hlYWRlcl9yaWdodCIsIm9wdGlvbnMiOnsiY3RfaWQiOjE1LCJjdF9wYXJlbnQiOjEwLCJzZWxlY3RvciI6Il9oZWFkZXJfcmlnaHQtMTUtMjI1In0sImNoaWxkcmVuIjpbeyJpZCI6MTcsIm5hbWUiOiJveHlfbmF2X21lbnUiLCJvcHRpb25zIjp7ImN0X2lkIjoxNywiY3RfcGFyZW50IjoxNSwic2VsZWN0b3IiOiJfbmF2X21lbnUtMTctMjI1Iiwib3JpZ2luYWwiOnsibWVudV9yZXNwb25zaXZlIjoicGFnZS13aWR0aCIsIm1lbnVfcmVzcG9uc2l2ZV9wYWRkaW5nX3NpemUiOiIwIiwibWVudV9yZXNwb25zaXZlX2ljb25fc2l6ZSI6IjI0IiwiZHJvcGRvd25zIjoib24iLCJtZW51X2Ryb3Bkb3duX2Fycm93Ijoib24iLCJtZW51X2lkIjoiMyIsIm1lbnVfY29sb3IiOiJjb2xvcigzKSIsIm1lbnVfZm9udC1zaXplIjoiMTYiLCJtZW51X2ZvbnQtd2VpZ2h0IjoiNTAwIiwibWVudV9sZXR0ZXItc3BhY2luZyI6IjEiLCJtZW51X3RleHQtdHJhbnNmb3JtIjoidXBwZXJjYXNlIiwibWVudV9wYWRkaW5nLXRvcCI6IjIwIiwibWVudV9wYWRkaW5nLWJvdHRvbSI6IjIwIiwibWVudV9wYWRkaW5nLWxlZnQiOiIyMCIsIm1lbnVfcGFkZGluZy1yaWdodCI6IjIwIiwibWVudV9ob3Zlcl9iYWNrZ3JvdW5kLWNvbG9yIjoiY29sb3IoMykiLCJtZW51X2FjdGl2ZV9ib3JkZXItYm90dG9tLXdpZHRoIjoiMiIsIm1lbnVfZHJvcGRvd25zX2hvdmVyX2JhY2tncm91bmQtY29sb3IiOiJjb2xvcigyKSIsIm1lbnVfZHJvcGRvd25zX2hvdmVyX2NvbG9yIjoiY29sb3IoMSkiLCJtZW51X3Jlc3BvbnNpdmVfZHJvcGRvd25zIjoib2ZmIiwibWVudV9ob3Zlcl9jb2xvciI6ImNvbG9yKDEpIiwibWVudV9ob3Zlcl9ib3JkZXItYm90dG9tLXdpZHRoIjoiMCIsIm1lbnVfanVzdGlmeS1jb250ZW50IjoiZmxleC1zdGFydCIsIm1lbnVfLXdlYmtpdC1mb250LXNtb290aGluZyI6ImFudGlhbGlhc2VkIiwibWVudV9hY3RpdmVfY29sb3IiOiJjb2xvcigyKSIsIm1lbnVfZHJvcGRvd25zX3BhZGRpbmctdG9wIjoiMTYiLCJtZW51X2Ryb3Bkb3duc19wYWRkaW5nLWJvdHRvbSI6IjE2IiwibWVudV9yZXNwb25zaXZlX2ljb25fY29sb3IiOiJjb2xvcigzKSIsIm1lbnVfcmVzcG9uc2l2ZV9pY29uX2hvdmVyX2NvbG9yIjoiY29sb3IoNikiLCJtZW51X3Jlc3BvbnNpdmVfbGlua19jb2xvciI6ImNvbG9yKDMpIiwibWVudV9yZXNwb25zaXZlX2hvdmVyX2xpbmtfY29sb3IiOiJjb2xvcig2KSIsIm1lbnVfcmVzcG9uc2l2ZV9wYWRkaW5nX3RvcCI6IjEyIiwibWVudV9yZXNwb25zaXZlX3BhZGRpbmdfYm90dG9tIjoiMTIifSwiY3RfbmF2X21lbnUiOiJ0cnVlIiwiaG92ZXIiOnsibWVudV9iYWNrZ3JvdW5kLWNvbG9yIjoiY29sb3IoMykiLCJtZW51X2Ryb3Bkb3duc19iYWNrZ3JvdW5kLWNvbG9yIjoiY29sb3IoMikiLCJtZW51X2Ryb3Bkb3duc19jb2xvciI6ImNvbG9yKDEpIiwibWVudV9jb2xvciI6ImNvbG9yKDEpIiwibWVudV9ib3JkZXItYm90dG9tLXdpZHRoIjoiMCIsIm1lbnVfcmVzcG9uc2l2ZV9pY29uX2NvbG9yIjoiY29sb3IoNikiLCJtZW51X3Jlc3BvbnNpdmVfbGlua19jb2xvciI6ImNvbG9yKDYpIn0sIm1lZGlhIjp7InBhZ2Utd2lkdGgiOnsib3JpZ2luYWwiOnsicGFkZGluZy10b3AiOiIyMiIsInBhZGRpbmctbGVmdCI6IjIyIiwicGFkZGluZy1yaWdodCI6IjIyIiwicGFkZGluZy1ib3R0b20iOiIyMiIsImRpc3BsYXkiOiJub25lIn19fSwiY3RfY29udGVudCI6IiJ9LCJkZXB0aCI6ZmFsc2V9LHsiaWQiOjYwLCJuYW1lIjoib3h5LWJ1cmdlci10cmlnZ2VyIiwib3B0aW9ucyI6eyJjdF9pZCI6NjAsImN0X3BhcmVudCI6MTUsInNlbGVjdG9yIjoiLWJ1cmdlci10cmlnZ2VyLTYwLTEwIiwib3JpZ2luYWwiOnsib3h5LWJ1cmdlci10cmlnZ2VyX3RleHQiOiJNZW51Iiwib3h5LWJ1cmdlci10cmlnZ2VyX3NsdWdfaGFtYnVyZ2VyYm94X21hcmdpbl9yaWdodCI6IjUiLCJveHktYnVyZ2VyLXRyaWdnZXJfc2x1Z19oYW1idXJnZXJib3hfX19idXJnZXJfc2l6ZSI6IjAuNyIsImRpc3BsYXkiOiJub25lIn0sIm1lZGlhIjp7InBhZ2Utd2lkdGgiOnsib3JpZ2luYWwiOnsiZGlzcGxheSI6ImJsb2NrIn19LCJ0YWJsZXQiOnsib3JpZ2luYWwiOnsiZGlzcGxheSI6ImJsb2NrIn19fSwiY3RfY29udGVudCI6IiJ9LCJkZXB0aCI6ZmFsc2V9XSwiZGVwdGgiOjF9XSwiZGVwdGgiOjF9LHsiaWQiOjY1LCJuYW1lIjoib3h5X2hlYWRlcl9yb3ciLCJvcHRpb25zIjp7ImN0X2lkIjo2NSwiY3RfcGFyZW50IjoyLCJzZWxlY3RvciI6Il9oZWFkZXJfcm93LTY1LTEwIn0sImNoaWxkcmVuIjpbeyJpZCI6NjYsIm5hbWUiOiJveHlfaGVhZGVyX2xlZnQiLCJvcHRpb25zIjp7ImN0X2lkIjo2NiwiY3RfcGFyZW50Ijo2NSwic2VsZWN0b3IiOiJfaGVhZGVyX2xlZnQtNjYtMTAiLCJjdF9jb250ZW50IjoiIn0sImRlcHRoIjoxfSx7ImlkIjo2NywibmFtZSI6Im94eV9oZWFkZXJfY2VudGVyIiwib3B0aW9ucyI6eyJjdF9pZCI6NjcsImN0X3BhcmVudCI6NjUsInNlbGVjdG9yIjoiX2hlYWRlcl9jZW50ZXItNjctMTAifSwiY2hpbGRyZW4iOlt7ImlkIjo2MSwibmFtZSI6Im94eS1zbGlkZS1tZW51Iiwib3B0aW9ucyI6eyJjdF9pZCI6NjEsImN0X3BhcmVudCI6NjcsInNlbGVjdG9yIjoiLXNsaWRlLW1lbnUtNjEtMTAiLCJvcmlnaW5hbCI6eyJveHktc2xpZGUtbWVudV9leHRyYV9tZW51X2xpbmtfcGFkZGluZ19wYWRkaW5nLWJvdHRvbSI6IjEyIiwib3h5LXNsaWRlLW1lbnVfZXh0cmFfbWVudV9saW5rX3BhZGRpbmdfcGFkZGluZy10b3AiOiIxMiIsIm94eS1zbGlkZS1tZW51X2V4dHJhX3NsaWRlX21lbnVfc3VibWVudV9tYXJnaW5fbWFyZ2luLWxlZnQiOiI0MCIsIndpZHRoLXVuaXQiOiIlIiwid2lkdGgiOiIxMDAiLCJveHktc2xpZGUtbWVudV9zdGFydCI6ImhpZGRlbiIsIm94eS1zbGlkZS1tZW51X3NsdWdfb3h5c2xpZGVtZW51bGlzdGN1cnJlbnRtZW51aXRlbWFfY29sb3IiOiJjb2xvcigzKSJ9LCJtZWRpYSI6eyJwYWdlLXdpZHRoIjp7Im9yaWdpbmFsIjp7Im94eS1zbGlkZS1tZW51X2V4dHJhX21lbnVfbGlua19wYWRkaW5nX3BhZGRpbmctbGVmdCI6IjEwIiwib3h5LXNsaWRlLW1lbnVfZXh0cmFfbWVudV9saW5rX3BhZGRpbmdfcGFkZGluZy1yaWdodCI6IjEwIn19fSwiY3RfY29udGVudCI6IiJ9LCJkZXB0aCI6ZmFsc2V9XSwiZGVwdGgiOjF9LHsiaWQiOjY4LCJuYW1lIjoib3h5X2hlYWRlcl9yaWdodCIsIm9wdGlvbnMiOnsiY3RfaWQiOjY4LCJjdF9wYXJlbnQiOjY1LCJzZWxlY3RvciI6Il9oZWFkZXJfcmlnaHQtNjgtMTAiLCJjdF9jb250ZW50IjoiIn0sImRlcHRoIjoxfV0sImRlcHRoIjoxfV0sImRlcHRoIjoxfV0sImNsYXNzZXMiOnsiYXRvbWljLWxvZ28iOnsia2V5IjoiYXRvbWljLWxvZ28iLCJwYXJlbnQiOiJhdG9taWMiLCJvcmlnaW5hbCI6eyJvcGFjaXR5IjoiMC44IiwidHJhbnNpdGlvbi1kdXJhdGlvbiI6IjAuNSIsInRyYW5zaXRpb24tdGltaW5nLWZ1bmN0aW9uIjoiZWFzZSIsInRyYW5zaXRpb24tcHJvcGVydHkiOiJhbGwifSwiaG92ZXIiOnsib3BhY2l0eSI6IjEifX19LCJjb2xvcnMiOnsiMyI6eyJpZCI6MywibmFtZSI6IkhpcHBpZSBCbHVlIiwidmFsdWUiOiIjNjc5OWIyIn19fQ==With every new component, we’ll create a few demos that showcase some of the features, so you can preview them inside different browsers and get a better idea of what the features are for.
Many of the previews will have a small ‘copy’ button that appears as you hover over the section. This is to allow you to copy the component to your clipboard, with it’s pre-configured settings (and sometimes other elements inside of it included), directly into a page or template in Oxygen.
Hydrogen Copy & Paste
To provide this option to copy, we’re taking advantage of Hydrogen Pack‘s Copy & Paste functionality. However, there is a free version in the WP repository called ‘Hydrogen Paste‘, which will provide the ‘paste’ option that you need to be able to paste in the components once they have been copied.
Workflow
- Make sure either Hydogen Pack / Paste is activated on your site and open up Oxygen.
- Head to the previews page of OxyExtras and click ‘copy’ on any of the components.
- Back inside Oxygen, press CTRL + V to paste into Oxygen. The components will appear.
Notes
You’ll notice some of the settings are applied with CLASS, some are applied with an ID. The ‘style controls’ are generally applied to the class of the element, the ‘option control’ that apply functionality will be using the ID.
This is because the functionality can’t be shared between each component in the same way that styles can with a class.
- If you’re changing a colour, adding a shadow, changing the height/width it’s wise to use a class if you’re likely to want to reuse those styles elsewhere.
- If you’re changing how many cells you wish to group together in a carousel, or the content source of a lightbox, or any sort of user interaction then you’re changing the functionality of that element.
One of of the updates made to the infinite scroller component in OxyExtras v1.3.0 was to add support for using with libraries such as Isotope & Masonry.
So if you’ve added a custom solution for filters using isotope, or are applying your own masonry layout using Easy Posts or Repeaters, the infinite scroller component will respect the layouts when loading the new posts.
For the most part this will work out of the box, as long as you choose the correct library that you’re using from the settings.
Note, I feel I must point out that even though this was added as a feature, after being requested, it’s not actually something I recommend for too many use cases. To quote David DeSandro who is behind both the infinite scroll library and isotope “..just because even though you can use these features together, maybe you should not”
In other words, using both filtering and limiting the posts visible by infinite scroll or pagination, although it’s possible. If there aren’t many posts in each category/filter result, it can sometimes lead to a confusing experience for the user. For example if the next batch of posts to be loaded don’t fit the filter criteria, nothing will show, which can be odd. Depending on what you’re creating, a dedicated facet search/filter plugin may work better for your use case.
Isotope filters & infinite scroll
If you’re adding filters to a repeater component using Isotope, (assuming you’re using the same method as shown in this tutorial.. Using Isotope To Sort & Filter Posts In WordPress With Oxygen), there’s just one extra step to ensure the filters will function correctly.
In Elijah’s Javascript code, on lines 12-17, he’s adding the categories as a class on the elements so they can be correctly filtered.
The classes are being added when the page first loads, when the document is ready.
We just need this to happen again when the new posts have loaded
The solution is to add this.. (using the append.infiniteScroll event to trigger the same classes to be added once the new posts are appended)
jQuery('.grid').on( 'append.infiniteScroll', function( event, body, path, items, response ) {

    jQuery('.category').each( function() {

      jQuery(this).closest('.grid-item').addClass(jQuery(this).text().toLowerCase());
      jQuery(this).remove();

    });

  });
That’s it. The full code, adding this part to Elijah’s is here..
https://gist.github.com/wplit/7e4e38528475ed52140fac5ecdf4de62
5mins
Easy to implement testimonial carousel using the new Carousel builder. Currently the carousel will work as a wrapper around the repeater component so any post type can be used.
This component will soon work with Woocommerce components like the product list component aswell as others.
We changed the folder name from oxyextras to oextras by mistake in v1.1.6 update.
That zip file has been deleted from the server and a correct one uploaded.
If you have already updated the plugin before seeing this message, please download the latest zip file from your account on and install it over your current plugin.
Sorry about the inconvenience.
One thing we’ve been asked a number of times is how to add scroll animations to alert boxes to reveal them only as the user scrolls the page. The common use case being when the alert is fixed to the viewport and the element needs to show as the user scrolls to a particular point on the page.
The Issue with Scroll Animations
You may have noticed that the built-in scroll animations won’t work when applying it to the alert box directly. Actually, the scroll animations won’t work on any component that has been built with Oxygen’s Elements API. You will find this is also true for the Pro Menu component, the Shape Divider component and all the official Woocommerce components.
That said, it doesn’t mean we can’t still take advantage of the built in scroll library. The way around it is to simply wrap the alert box in a div. We can then position the div as fixed to the viewport, instead of the alert box and then apply the scroll animations to the container div instead of the alert box inside.
The important thing is to not add any styles to the div itself, only change the position to ‘fixed’, position it relative to the viewport with the top/left/right/bottom where you need it and add the scroll animation effect. The width, height and all other styles should be on the alert box itself.
Revealing at a Certain Scroll Position
As our new container div will be fixed to the viewport, we’ll need to make use of the ‘anchor’ setting in the scroll animations to control exactly when the element is revealed.
This anchor would be the section or element on the page that the user would scroll to in order for the div (and the alert) to become visible.
This is what the settings would look like on our div element if we wanted the alert inside to be made visible when the user scrolls down to a specific section that we have given the class ‘.alert-trigger’.
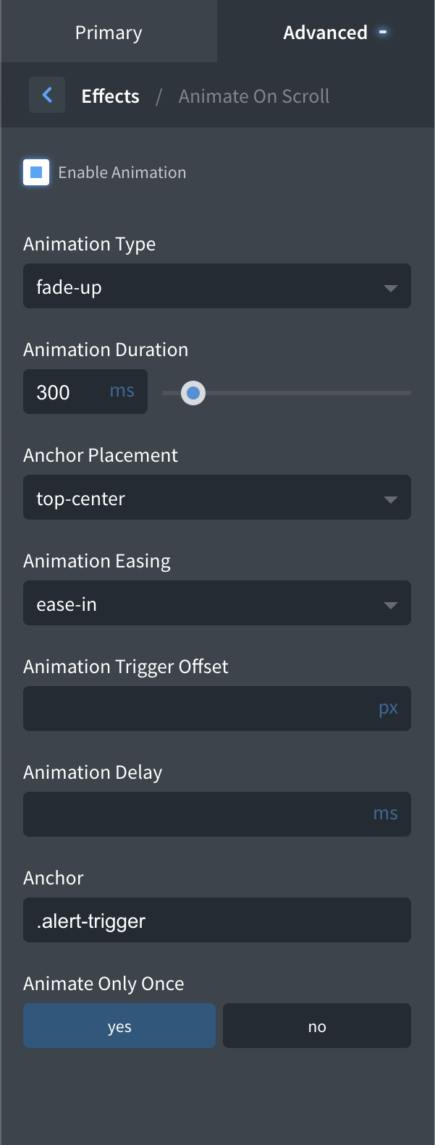
The anchor placement being set at ‘top-center’ means that the animation will be triggered when the ‘top’ of this section reaches the ‘center’ of the viewport. This can be changed to however you want it to be, you can also add an offset if you want more precise control over the number of pixels scrolled.
That’s it
Although not the ideal solution, hopefully Oxygen will add support for scroll animations on these new components soon, this is a fairly simple way to get the end result you need.
This article provides the steps to set up a fixed Burger Trigger near the top left corner of the browser and appearing on top of the Off Canvas component having a Slide Menu.
We shall make the hamburger menu static from 768px to 1300px since it will be overlapping the logo during these widths when using the Atomic design set of Oxygen. These widths can be changed depending on your site’s header layout.
Here is the sample structure after you have implemented the steps below.
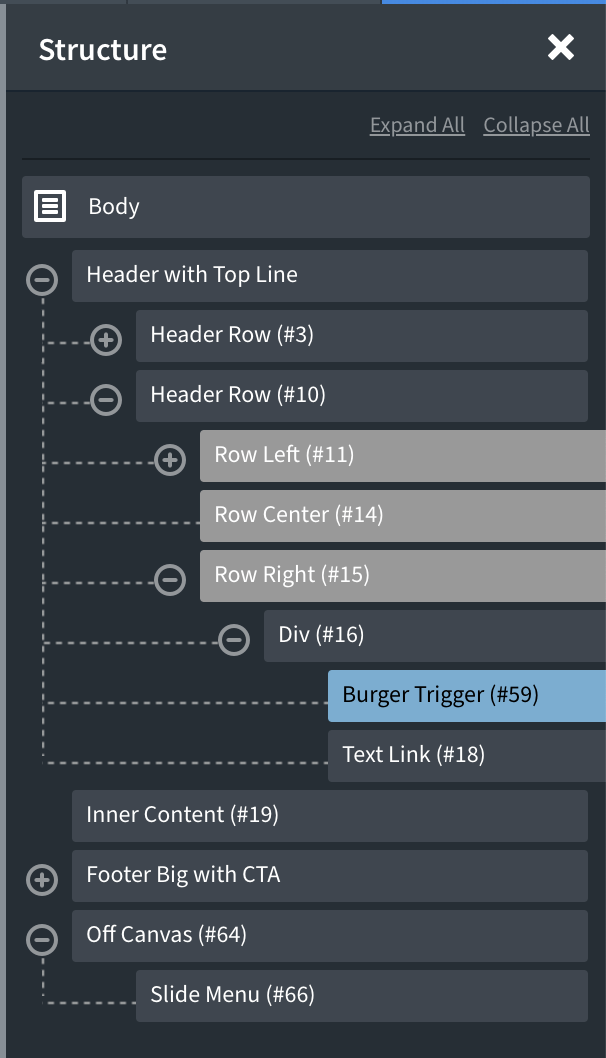
Step 1
Edit your Main catch all template with Oxygen and add a Burger Trigger component. In this example, let’s add it to the left of text link in Header Builder’s Header Row (bottom one).
Set the Burger Line Height to 3 to make the hamburger’s lines thinner.
Go to Button Styles and set a padding of 10px each on top, left and bottom and 15px on the right.
Background Color: #ffffff
Border Radius: 30px
Go to Button Text and add MENU text. If you would like to change the font size of this text, you can do so at Typography.
Go to Advanced > Layout.
Set Position to fixed with 20px top and left each.
Set Z-index of 1001.
Step 2
Add an Off Canvas component below all the other components.
Under Layout / Spacing you might want to add a value like 100px so that there will be space for the X icon.
Add a Slide Menu inside the Off Canvas and select your desired menu to be shown.
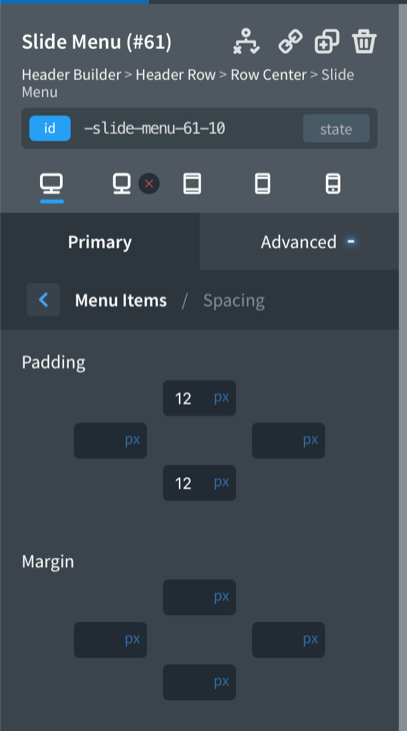
In our example site, we added 10px padding at the top and bottom under Menu Items / Spacing.
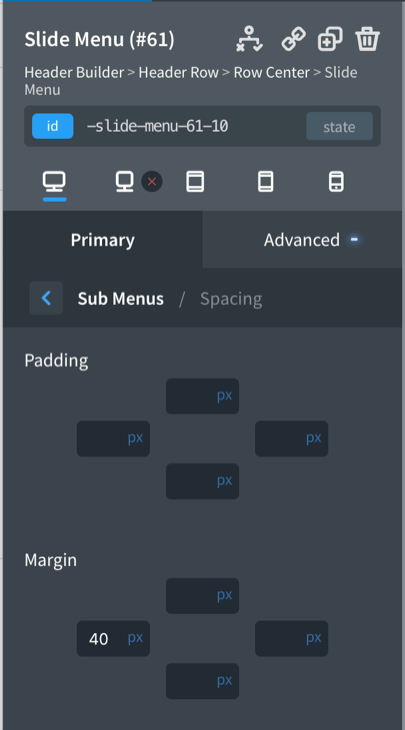
Then under Sub Menus / Spacing, added 20px left padding.
Step 3
Let us add some custom CSS at Manage > Stylesheets.
.admin-bar #-burger-trigger-59-29 {
	top: 52px; /* 20 + 32 */
}

@media only screen and (max-width: 782px) {
	.admin-bar #-burger-trigger-59-29 {
		top: 66px; /* 20 + 46 */
	}
}

.hamburger-box {
	transform: scale(0.5);
}

@media only screen and (min-width: 768px) and (max-width: 1300px) {
	#-burger-trigger-59-29 {
		position: static;
	}
}
Replace all instances of -burger-trigger-59-29 in the above with the ID of your Burger Trigger.
.admin-bar #-burger-trigger-59-29 {
	top: 52px; /* 20 + 32 */
}

@media only screen and (max-width: 782px) {
	.admin-bar #-burger-trigger-59-29 {
		top: 66px; /* 20 + 46 */
	}
}
will ensure that the fixed hamburger menu will be 20px from the top even when admin bar is visible. 32px is the height of the admin bar above 783px. 782px and below it is 46px tall.
.hamburger-box {
	transform: scale(0.5);
}
will reduce the size of the hamburger menu lines.
@media only screen and (min-width: 768px) and (max-width: 1300px) {
	#-burger-trigger-59-29 {
		position: static;
	}
}
will make the hamburger menu static during the viewport widths when it will be overlapping the logo. You may need to change these widths or make any other adjustments as needed.
1:06mins
Easy to implement header search functionality with three types of header search.
4:45 mins
Showcasing two AJAX Woocommerce components. The mini cart and the cart counter. Both can be used together or with existing components like the Offcanvas and the Modal.
Vid – 6mins
A quick over the shoulder on visually styling a polling Fluent Form using the fluent form component in OxyExtras.
